Friday, November 22, 2024
DIY Wooden Pallet Shed Plans: Build Your Own Storage Solution

DIY Wooden Pallet Shed Plans: Build Your Own Storage Solution
Tired of overflowing garages and cluttered yards? Yearning for a charming, rustic storage solution without breaking the bank? Then building your own shed from reclaimed wooden pallets is the perfect project for you! This guide provides detailed plans and steps to help you construct a sturdy and attractive shed that perfectly complements your outdoor space. Forget expensive pre-fabricated structures; unleash your inner builder and create a personalized storage haven.
Assessing Your Needs and Materials
Before you dive into construction, carefully plan your shed's dimensions and functionality. Consider the size of items you'll be storing. Do you need space for gardening tools, bicycles, or larger equipment? Measure your available space to ensure the shed fits comfortably. Next, gather your materials. Reclaimed wooden pallets are the cornerstone of this project. Inspect them thoroughly; choose sturdy pallets free from rot, significant damage, or pest infestation. You'll also need:
- Screws and nails: Opt for exterior-grade galvanized fasteners for durability.
- Pressure-treated lumber: For the base and any structural supports needing extra strength.
- Plywood or OSB: For sheeting the walls and roof.
- Roofing material: Asphalt shingles, metal roofing, or even recycled corrugated plastic are all suitable options.
- Hinges and a latch: For the shed door.
- Measuring tape, level, saw, drill, and safety glasses: Essential tools for efficient construction.
Step-by-Step Construction Guide
Building the Base
Begin by creating a level base for your shed. This is crucial for stability. Use pressure-treated lumber to build a sturdy frame, ensuring it's perfectly square. Securely fasten the frame to the ground using concrete anchors or by setting the frame into the ground. This base will support the entire weight of your shed, so take your time and double-check your measurements.
Assembling the Walls
Carefully dismantle the pallets, separating usable planks. Inspect each plank for soundness before use. Construct the walls by attaching the pallet planks to the base frame, creating a strong and aesthetically pleasing structure. Remember to leave space for the door opening. Consider adding cross-bracing for extra rigidity and stability. For a more polished look, you can fill gaps between pallet planks using wood filler and then sand the surfaces smooth.
Constructing the Roof
Build a simple gable or shed roof using pressure-treated lumber for rafters and plywood or OSB for sheathing. Ensure adequate overhang to protect the walls from rain. Once the roof framing is complete, attach your chosen roofing material, securing it firmly to withstand various weather conditions. Proper roof construction is vital for protecting your stored items.
Adding the Door and Finishing Touches
Install the door using sturdy hinges and a secure latch. Consider adding extra bracing to the door frame for added security. For a more polished finish, sand all surfaces smooth and apply a protective sealant or paint to weatherproof your shed and enhance its appearance. You can add extra features like a small window or shelves for increased functionality and visual appeal.
Safety First!
Throughout the construction process, prioritize safety. Wear appropriate safety glasses and gloves. Use caution when handling power tools and always follow manufacturer’s instructions. Ensure the shed is built on level ground and take steps to prevent the structure from shifting or collapsing.
Building your own wooden pallet shed is a rewarding project that combines creativity, resourcefulness, and practical skills. With careful planning and attention to detail, you can create a unique and functional storage solution that you'll enjoy for years to come. So, gather your tools, and let the building begin!
Thursday, November 21, 2024
How to Build a Wood Pallet Shed: Practical Storage Ideas for Your Backyard
How to Build a Wood Pallet Shed: Practical Storage Ideas for Your Backyard
The construction of a wood pallet shed presents a compelling blend of cost-effectiveness and environmental consciousness. Utilizing reclaimed pallets, readily available at little to no cost from various sources, allows for the creation of a functional and aesthetically pleasing storage solution for your backyard. This comprehensive guide will delineate the process of designing, constructing, and personalizing a durable and attractive pallet shed, emphasizing practical considerations throughout each stage.
Phase 1: Planning and Design Considerations
Before initiating construction, meticulous planning is paramount. This phase involves defining the shed’s purpose, dimensions, and overall aesthetic. Careful consideration of local building codes and regulations is crucial to ensure compliance and avoid potential setbacks.
Defining the Shed's Purpose and Size
The intended purpose of your pallet shed will directly influence its dimensions and internal layout. A shed intended for storing gardening tools will have different requirements than one designed for housing outdoor furniture or equipment. Accurate estimation of the storage volume required is essential for determining the shed's footprint. Consider measuring the items you intend to store to ensure adequate space.
Selecting the Appropriate Pallets
The selection of pallets is a critical aspect of the project. Not all pallets are created equal. Prioritize pallets constructed from durable, pressure-treated lumber that is free from significant rot, warping, or pest infestation. Inspect each pallet thoroughly, discarding those exhibiting signs of damage. Consider the dimensions and overall condition of each pallet to maximize efficiency during construction.
Site Selection and Foundation
The location of your shed should be carefully chosen. Factors to consider include proximity to power sources (if needed), accessibility, drainage, and sunlight exposure. A level base is critical for structural integrity. Options for creating a level foundation include using concrete, compacted gravel, or a wooden frame. The chosen foundation will depend on the soil conditions and the overall weight of the shed.
Addressing Building Codes and Regulations
Consult your local building codes and obtain any necessary permits before commencing construction. Regulations pertaining to shed size, height, and materials may vary depending on your location. Compliance with these regulations is essential to avoid legal issues and potential demolition orders. Seeking clarification from local authorities regarding specific requirements is strongly recommended.
Phase 2: Construction and Assembly
This phase involves the actual construction of the shed, encompassing the foundation, framing, wall assembly, roofing, and door installation. Precise measurements and careful assembly are essential to ensure structural integrity and longevity.
Foundation Preparation
Once the site is selected and cleared, prepare the foundation according to your chosen method. If using concrete, ensure a level surface is achieved before pouring. For a gravel base, compact the gravel thoroughly to prevent settling. A wooden frame foundation requires sturdy construction to support the weight of the shed. Ensure that the foundation is appropriately sized to accommodate the shed's footprint.
Framing and Wall Construction
The framing of the shed provides the structural support for the walls and roof. Use sturdy lumber to create a robust frame. Connect the frame members using appropriate fasteners, ensuring all joints are secure and aligned. The pallet walls are then attached to this frame. Consider using screws or nails to attach the pallets, ensuring they are tightly fastened to the frame to prevent shifting or instability. Vertical alignment of the pallets is crucial for aesthetic appeal and structural integrity. Shimming may be necessary to compensate for uneven pallet dimensions.
Roof Construction
The roof design should complement the overall aesthetic of the shed and provide adequate protection from the elements. A simple gable roof is a practical and easily constructible option. Construct the roof frame using appropriately sized lumber and secure it to the top of the wall frame. Apply roofing material that is suitable for your climate and budget. Options include plywood covered with roofing felt, metal roofing sheets, or even repurposed materials like corrugated plastic. Ensure proper drainage to prevent water accumulation on the roof and potential damage to the shed.
Door Installation
The door should be appropriately sized and constructed to provide easy access to the shed's interior. Consider using repurposed pallets to create a door frame, which can be attached to the wall framing. The door itself can be created using smaller sections of pallets, or you might opt for a more traditional door design using purchased lumber. Install hinges and a latch or lock to secure the door.
Phase 3: Finishing Touches and Personalization
The final phase focuses on enhancing the shed’s aesthetics and functionality through finishing touches and personalization. This may involve painting, staining, adding shelves, or incorporating other features to meet your specific needs.
Surface Treatment
Applying a protective finish to the wood pallets is highly recommended to increase the shed's longevity and resistance to the elements. Options include painting the pallets with exterior-grade paint, staining them for a more natural look, or applying a wood sealant. The chosen finish should be weather-resistant to protect the wood from moisture damage and rot. Multiple coats may be necessary for optimal protection.
Interior Organization and Storage Solutions
Optimize the shed's interior space through the installation of shelving units, hanging racks, or other storage solutions. This will ensure efficient storage of items and prevent clutter. Consider incorporating customized storage based on the specific items you intend to store. For example, a tall, narrow shelf might be ideal for storing garden tools with long handles, while shorter shelves are suitable for smaller items.
Exterior Enhancements
Consider adding exterior features such as a small window for ventilation and natural light. A weather vane or decorative trim can enhance the shed's visual appeal. Landscaping around the shed can further integrate it into your backyard environment. Consider adding plants, flowers, or other decorative elements to make it more aesthetically pleasing.
Safety Considerations
Throughout the construction process, prioritize safety. Wear appropriate personal protective equipment (PPE), including safety glasses, gloves, and work boots. Use caution when handling power tools and follow all manufacturer’s instructions. Ensure the stability of the structure throughout the construction process. Never work alone on the project. Seek assistance if needed for lifting heavy objects or completing complex tasks.
By following these steps, you can successfully build a functional and aesthetically pleasing wood pallet shed that provides valuable storage space in your backyard while utilizing environmentally friendly materials. Remember to adapt the design and construction process to your specific needs and resources, always prioritizing safety and adherence to building codes.
How to Build a Pallet Shed DIY: Easy-to-Follow Plans for Beginners

How to Build a Pallet Shed DIY: Easy-to-Follow Plans for Beginners
Hey there, fellow DIY enthusiasts! So, you're thinking about building your own pallet shed? Awesome! It's a fantastic project that's surprisingly achievable, even if you're a complete beginner. This guide will walk you through the process, step-by-step, in a way that's easy to understand and follow. Let's get started!Planning Your Pallet Shed Paradise
Before you even think about grabbing a hammer, let's get the planning sorted. This is the crucial first step that will save you headaches later on.Size and Location
First things first: How big do you want your shed to be? Think about what you plan to store inside. A small shed for garden tools will require less space than one for storing lawnmowers and bikes. Consider the available space in your yard and ensure your shed won't obstruct pathways or sunlight. You’ll also want to check your local zoning regulations to make sure you're allowed to build a shed on your property.
Materials Gathering: The Pallet Hunt!
This is where the fun (and potentially the frugality!) begins. The beauty of a pallet shed is that it utilizes reclaimed materials, mainly pallets. But not all pallets are created equal. You need to find pallets that are sturdy and free of any rot, pests, or chemical treatments (like pesticides). Check with local businesses; many are happy to give away pallets they no longer need. Inspect each pallet carefully before bringing it home. You'll need quite a few depending on the size of your shed, so aim to find a good number in decent condition.
Beyond pallets, you'll also need:
- Screws: Plenty of exterior-grade screws (galvanized are best) in various lengths.
- Hammer or Nail Gun (optional): If using nails, a nail gun can speed things up considerably.
- Measuring Tape and Level: Essential for accuracy and ensuring your shed is square.
- Saw (hand saw or circular saw): For cutting pallets to size (a circular saw makes this much faster).
- Drill/Driver: A must-have for driving screws efficiently.
- Safety Glasses and Gloves: Always prioritize safety!
- Post Mix Concrete or strong base supports: To create a solid foundation for your shed
- Roofing Material: Tarpaulin, corrugated metal sheeting, or even recycled materials like plastic sheeting are options. Consider your climate and budget
- Optional: Paint or sealant to protect the wood.
Building Your Pallet Shed: A Step-by-Step Guide
Now for the exciting part! This guide will use a simple, rectangular shed design as an example. You can adapt these steps to build different styles, but the core principles remain the same.
Foundation First
Don’t skip this crucial step! Your shed will only be as strong as its foundation. You have two options; a concrete base for maximum durability or a strong base of heavy-duty timber, bricks or similar to keep the pallets off the ground and protected from moisture. Regardless of your choice, ensure it's level before you proceed. Ideally the base should be slightly larger than the pallet structure.
Building the Floor
Lay your pallets down on the foundation, arranging them to create the floor. You might need to cut some pallets to fit perfectly. Secure the pallets together using screws. Aim for a solid, even floor. If using a timber substructure, ensure the pallets sit securely on it.
Constructing the Walls
This is where you'll need to get creative. You'll likely need to assemble sections of wall from multiple pallets, potentially cutting and joining them to achieve the correct height. Use screws to fasten the pallets together, creating sturdy vertical sections. Ensure the walls are plumb (perfectly vertical) using your level.
Raising the Walls
Once the wall sections are ready, carefully lift and assemble them on top of the floor, securing them together at the corners. Use corner bracing or additional support to maintain the structure's integrity, especially if dealing with taller walls. For extra strength, consider adding cross-bracing to the inside of the walls.
Roofing the Shed
The roofing is important for protecting your stored items. Your chosen roofing material will dictate how this is done. For a simple shed, you could create a gable roof using more pallets, angled to shed water. Secure the roof structure with screws and then add your roofing material (tarpaulin, corrugated metal, etc.), ensuring it's watertight.
Finishing Touches and Maintenance
Once your shed is built, you might want to add some finishing touches.
- Paint or Sealant: This will help protect the wood from the elements and enhance the shed's appearance.
- Door and Windows (Optional): Depending on your design, you might want to add a door and/or windows.
- Ventilation: Add vents to improve air circulation and prevent moisture buildup.
Regular maintenance is key to ensuring your pallet shed lasts. Inspect it periodically for any damage and address it promptly. Treat the wood with sealant or paint every couple of years, especially in harsh weather conditions.
Frequently Asked Questions (FAQ)
Here are some common questions people have about building pallet sheds:
Are all pallets suitable for building a shed?
No. Avoid pallets that are rotten, infested with insects, or treated with harmful chemicals. Look for heat-treated pallets (marked with an HT stamp) as these are generally safer.
How long does it take to build a pallet shed?
This depends on the size and complexity of your shed, as well as your experience level. A simple shed can take a weekend, while a larger, more complex one might take several days or even a week.
Do I need planning permission to build a pallet shed?
This varies depending on your location and the size of the shed. Check your local council's regulations before you start building. Small sheds are often exempt from planning permission, but you should always check.
How much does it cost to build a pallet shed?
The main cost is your time and the additional materials you purchase (screws, roofing, etc.). Sourcing free pallets can significantly reduce the overall cost. Budget a few hundred dollars for materials.
I hope this guide has inspired you to start your own pallet shed project! Remember, it's a learning process, so don't be afraid to experiment and adjust the plans to fit your needs. Happy building!
Create a Custom Wood Pallet Shed for Your Yard with These Easy Plans

Constructing a Custom Wood Pallet Shed for Your Yard: A Comprehensive Guide
This detailed guide provides comprehensive instructions for constructing a robust and aesthetically pleasing shed utilizing reclaimed wood pallets. The project, while requiring some carpentry skills, is designed to be achievable for DIY enthusiasts with moderate experience. Careful planning and meticulous execution are key to a successful outcome. This guide will cover material selection, structural design, construction steps, and finishing touches, equipping you with the knowledge necessary to build your own custom pallet shed.
Phase 1: Planning and Material Acquisition
Before commencing any construction, thorough planning is paramount. This phase focuses on designing the shed's dimensions, sourcing materials, and preparing the site.
1.1 Shed Design and Dimensions
Determine the desired dimensions of your shed based on your storage needs and available yard space. Consider factors such as the number and size of items you plan to store, accessibility, and aesthetic integration with your landscape. Create detailed sketches or utilize digital design software to visualize your shed's structure. Typical dimensions range from 4ft x 6ft to 8ft x 10ft, but larger structures are certainly possible with careful planning and stronger framing.
1.2 Sourcing Reclaimed Wood Pallets
The foundation of this project relies on the acquisition of suitable wood pallets. Source these from reputable suppliers or local businesses that are discarding them. Inspect each pallet carefully for structural integrity; avoid pallets exhibiting significant damage, rot, or infestation. Prioritize pallets constructed from durable hardwoods like oak or pine. Determine the quantity required based on your shed's dimensions and the pallet's dimensions (standard pallets are approximately 48" x 40"). Ensure you have a surplus to account for potential damage or imperfections during construction.
1.3 Site Preparation
Select a level and well-drained location for your shed. Clear the area of vegetation, debris, and any potential obstructions. Mark the shed's footprint using stakes and string to ensure accurate positioning. If the ground is uneven, level the area using gravel or compacted soil to provide a stable foundation. Consider obtaining necessary permits from your local authorities before commencing construction, depending on your local building codes and the size of the structure.
Phase 2: Shed Construction
This phase outlines the detailed steps involved in building the shed's frame, walls, roof, and floor.
2.1 Foundation and Floor Construction
Construct a solid foundation to support the shed's weight. Options include a concrete slab, a compacted gravel base, or a wooden platform. For a simpler approach, a compacted gravel base is suitable for lighter sheds. Once the foundation is prepared, construct the floor using additional pallets or treated lumber. Ensure the flooring is level and provides a stable base for the walls.
2.2 Wall Framing and Pallet Installation
Erect the wall frames using pressure-treated lumber for optimal durability. The frame should be strong enough to support the weight of the pallets and the roof. Once the frame is complete, begin attaching the pallets to the frame, ensuring they are securely fastened with appropriate screws or nails. You may need to cut or modify some pallets to fit perfectly. Stagger the joints between pallets for added strength and structural integrity. Leave gaps for ventilation as needed.
2.3 Roof Construction
The roof design can vary depending on your preference and skill level. A simple gable roof is a common and effective choice. Construct the roof trusses using pressure-treated lumber, ensuring they are adequately reinforced to withstand local weather conditions. Cover the trusses with plywood or more pallets, depending on the desired aesthetic. Apply roofing felt or other suitable roofing material to ensure weather protection.
2.4 Door and Window Installation
Incorporate a door and windows into your design for easy access and ventilation. Frame the door and window openings using pressure-treated lumber before installing the pallets. Utilize pre-hung doors for ease of installation or construct a custom door from pallets. Windows can be purchased pre-made or constructed from salvaged materials. Ensure proper sealing and weatherproofing around the door and window openings.
Phase 3: Finishing Touches and Refinement
This final phase focuses on enhancing the shed's appearance and durability.
3.1 Surface Treatment
Apply a protective sealant or paint to enhance the longevity of the wood pallets. Choose a weather-resistant sealant or paint designed for exterior use to protect against moisture and UV damage. Apply multiple coats for optimal protection. Consider stain or paint to match your existing landscape or achieve a specific aesthetic.
3.2 Hardware and Accessories
Install appropriate hardware, including hinges, handles, and locks, to secure the door and windows. Consider adding additional features such as shelves, hooks, or lighting to enhance the shed's functionality. Choose durable hardware appropriate for exterior use to resist corrosion and weather damage.
3.3 Landscaping Integration
Integrate the shed into your landscape by planting vegetation around it or constructing a small patio. This improves the overall aesthetics and can enhance the shed's surroundings. Consider adding pathways for easy access and overall landscaping design to compliment your new shed.
Safety Precautions
Throughout the construction process, prioritize safety. Always wear appropriate safety gear, including safety glasses, work gloves, and dust masks. Use caution when handling power tools and ensure proper ventilation when working with paints and sealants. Follow all manufacturer's instructions for tools and materials. Always lift heavy objects safely, using proper lifting techniques to avoid injury.
Conclusion
Building a custom wood pallet shed is a rewarding project that combines creativity, resourcefulness, and practical skills. By carefully following these instructions, you can create a functional and aesthetically pleasing addition to your yard. Remember to prioritize safety and take your time to ensure a high-quality finished product. The satisfaction of creating something useful and unique from reclaimed materials is immeasurable.
Disclaimer: This guide provides general instructions. Always consult local building codes and regulations before commencing any construction project. The author assumes no responsibility for any damages or injuries resulting from the implementation of these instructions.
DIY Pallet Shed: Free Plans for Creating a Reliable Outdoor Shed
DIY Pallet Shed: Free Plans for Creating a Reliable Outdoor Shed
Tired of overflowing garages and cluttered yards? Yearning for a stylish and functional storage solution without breaking the bank? Then building your own pallet shed is the perfect project for you! This guide provides free plans and step-by-step instructions to construct a reliable outdoor shed using reclaimed pallets. Forget expensive pre-fabricated structures â€" let's harness the rustic charm and cost-effectiveness of repurposed materials to create a storage haven tailored to your needs.
Assessing Your Needs and Gathering Materials
Before diving into construction, carefully consider your storage requirements. What will you store in your shed? This dictates the necessary size and features. Do you need shelving? Ventilation? A workbench? Sketch a simple design, noting dimensions and desired features. Next, gather your materials. The heart of your project lies in sourcing free or inexpensive pallets. Inspect them thoroughly for rot, damage, and loose nails. You'll need a significant number, depending on your shed's size, aiming for sturdy and consistent pallets for a reliable structure. Beyond pallets, acquire these essential supplies:
- Screws: Choose exterior-grade screws for durability.
- Wood glue:
- Hammer and nails (optional, for reinforcement):
- Measuring tape and level:
- Circular saw or hand saw:
- Drill:
- Safety glasses and work gloves:
- Optional: Roofing materials (e.g., corrugated metal, asphalt shingles), paint or stain, hinges, and a lock.
Constructing the Pallet Shed Frame
Start by creating the base. You can either use more pallets laid flat or construct a simple frame from treated lumber for added stability. Ensure the base is level, using shims if necessary, to prevent future issues. Then, begin assembling the walls. You might choose to create a basic frame using strong pallets, securing them together with screws and wood glue. Remember, vertical pallets offer excellent strength and visual appeal. Carefully align each pallet to ensure a square structure. For added robustness, consider adding diagonal bracing to the corners. Utilize longer screws and wood glue for superior joining strength.
Building the Roof
The roof is crucial for protecting your stored items. Construct a simple gable or shed roof using more pallets, carefully positioning them to create the desired slope. Ensure adequate overlap for water runoff. For increased weather resistance, consider adding a layer of roofing felt or using more weather-resistant roofing materials like corrugated metal or asphalt shingles. Secure the roofing material thoroughly to prevent leaks.
Adding Finishing Touches and Enhancements
Once the structure is complete, add finishing touches to personalize and enhance your shed. Consider adding a door using salvaged pallet wood or purchasing a pre-made door. Install hinges and a lock for security. You can paint or stain your shed for aesthetic appeal and weather protection. If desired, add interior shelving using additional pallets or lumber. And don't forget to clean up any debris, leaving behind a functional and attractive outdoor storage solution built entirely from repurposed materials.
Building a pallet shed is a rewarding project that combines creativity with practicality. By following these instructions and utilizing freely available resources, you can transform discarded pallets into a valuable addition to your property. Enjoy the process and the pride of creating something functional and aesthetically pleasing from reclaimed materials!
DIY Pallet Shed: How to Create a Shed Using Reclaimed Pallets

DIY Pallet Shed: Reclaim, Repurpose, and Build Your Dream Storage Solution
Tired of overflowing garages and cluttered yards? Yearning for a charming and functional shed without the hefty price tag? Then look no further! This guide will walk you through building your own DIY pallet shed, transforming reclaimed wood into a beautiful and practical storage solution. Prepare to embrace your inner builder and discover the rewarding experience of creating something unique and sustainable from repurposed materials.
Planning Your Pallet Shed: Size, Location, and Design
Before diving into the construction, careful planning is key. First, determine the ideal size for your shed based on your storage needs. Consider the space available in your yard and ensure the shed’s footprint complies with any local building codes. Sketch a basic design, noting the dimensions, door placement, and any desired windows. This initial planning will streamline the building process considerably. Don't forget to account for the weight of the finished structure â€" choose a suitable location that can support its weight.
Choosing the Right Pallets
Source your pallets carefully. Opt for sturdy pallets made of heat-treated wood (HT) â€" indicated by an IPPC stamp â€" to avoid potential pest infestations. Inspect each pallet thoroughly for damage; replace any rotten or significantly damaged planks. Clean the pallets thoroughly, removing any dirt, debris, nails, or staples that could pose a safety hazard during construction.
Gathering Your Tools and Materials
Building a pallet shed requires a range of tools and materials. You'll need basic carpentry tools such as a hammer, saw (circular saw recommended for efficiency), measuring tape, level, drill, and screwdriver. Secure appropriate safety equipment including safety glasses and work gloves. Beyond the reclaimed pallets, you’ll need additional materials like screws, nails, hinges, a latch for the door, roofing materials (e.g., corrugated metal sheets or asphalt shingles), and potentially pressure-treated lumber for the base (to prevent rot).
Preparing the Foundation
Construct a solid foundation to ensure your shed’s longevity. A simple concrete slab or a leveled gravel base will work well. Ensure the base is level and large enough to accommodate the shed’s footprint. This step is critical for preventing sagging and ensuring the shed’s stability.
Constructing the Pallet Shed: A Step-by-Step Guide
Begin by assembling the shed's frame using the strongest, least-damaged pallets. Secure the pallets together using screws and/or nails, reinforcing connections with extra bracing where necessary. Pay close attention to creating square corners and maintaining structural integrity. Remember to pre-drill holes before screwing to prevent wood splitting. Gradually build up the walls, ensuring they are plumb and level throughout the process. The process requires patience and attention to detail.
Building the Roof
Once the walls are complete, construct the roof frame using additional pallets or pressure-treated lumber. The roof design can be simple; a gable roof is a straightforward and effective option. Securely attach the roofing material to the frame. Ensure proper overhang to protect the walls from the elements.
Installing the Door and Finishing Touches
Create the door frame using strong pallets or lumber and carefully attach it to the structure. Hang the door using sturdy hinges and secure a latch for added security. You can further enhance the shed’s aesthetic appeal and weather resistance by adding a layer of paint or stain, sealing any exposed wood with a weatherproof sealant. Add personal touches, such as shelves or hooks, to maximize storage space and customize your new structure.
Maintaining Your Pallet Shed
Regular maintenance ensures your pallet shed's longevity. Inspect the structure periodically for any signs of damage or deterioration. Repair any loose boards or damaged sections promptly. Apply a fresh coat of sealant or paint every few years to protect against the elements. With proper care, your DIY pallet shed will provide years of reliable storage.
Building a pallet shed is a rewarding project that combines creativity, resourcefulness, and a touch of DIY magic. By following these steps, you can transform reclaimed pallets into a beautiful and functional addition to your property, all while enjoying the satisfaction of a job well done!
No-Fuss Lean-To Shed Build: Easy Plans for Your Outdoor Storage
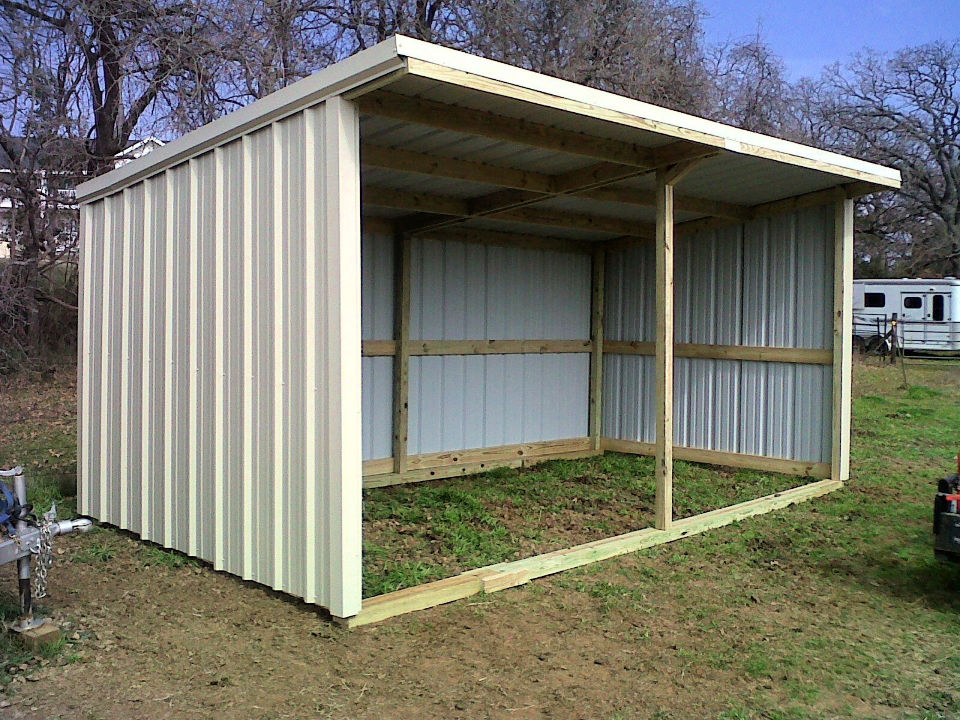
No-Fuss Lean-To Shed Build: Easy Plans for Your Outdoor Storage
Tired of clutter overflowing your garage and garden shed? Yearning for a simple, affordable solution to your outdoor storage woes? Then building a lean-to shed is the perfect weekend project! This guide provides easy-to-follow plans, transforming your outdoor space from chaotic to organized in no time. Forget complicated blueprints and expensive contractors; we'll walk you through a straightforward construction process that anyone can tackle, regardless of their DIY experience. Get ready to reclaim your outdoor space and enjoy the satisfaction of a job well done.
Planning Your Lean-To Shed
Before you grab your tools, careful planning is essential. First, determine the ideal location for your lean-to. Consider proximity to your house or existing structures for easy access and minimizing weather exposure. You’ll need to choose a sturdy, level surface to build uponâ€"a concrete slab, compacted gravel, or a well-prepared earthen base will work. Next, decide on the size of your shed. Measure your available space and determine the dimensions that best suit your storage needs. Remember to check local building codes before beginning construction; these may dictate certain size restrictions or material requirements. Sketch a simple design, noting the dimensions of the walls, roof, and any doors or windows you plan to incorporate. This simple plan will serve as your guide throughout the build.
Gathering Your Materials and Tools
With your plans finalized, gather the necessary materials. A basic lean-to requires pressure-treated lumber for its longevity and resistance to rot. Pressure-treated 4x4 posts will form the sturdy foundation. 2x4s will constitute the framing of the walls and roof. You'll also need plywood sheeting for the walls and roof covering, roofing material (shingles, metal, or tar paper), nails, screws, and construction adhesive. Don't forget essential tools including a measuring tape, level, saw (circular saw or hand saw), drill, hammer, shovel, and safety glasses. Having all these materials and tools ready will ensure a smooth and efficient building process.
Essential Material List:
- Pressure-treated 4x4 posts
- Pressure-treated 2x4 lumber
- Plywood sheeting
- Roofing material (shingles, metal, or tar paper)
- Nails and screws
- Construction adhesive
Step-by-Step Construction
Start by setting your 4x4 posts into the ground, ensuring they are plumb and firmly anchored. Next, construct the frame for your lean-to walls, using 2x4s and joining them with screws and adhesive for extra strength. Remember to maintain consistent measurements throughout the process. Once the walls are framed, attach the plywood sheeting. Now, frame and cover the roof, ensuring a proper slope to facilitate water runoff. Secure your chosen roofing material, following the manufacturer’s instructions. Finally, add a door if needed, and consider adding extra touches like paint or stain to personalize your lean-to. Congratulations, your new outdoor storage space is complete!
Finishing Touches and Maintenance
After the construction, add a final coat of weather-resistant paint or stain to protect your lean-to from the elements. Regular maintenance will ensure its longevity. Check for any loose nails or screws periodically and tighten them as needed. Inspect the roof for any damage after storms and repair it promptly. By taking these simple maintenance steps, you’ll extend the lifespan of your lean-to shed and enjoy its benefits for years to come. Your no-fuss lean-to shed is a testament to your DIY skills and provides practical, organized storage that enhances your outdoor living space.
DIY Small Pallet Shed: Step-by-Step Guide for Beginners

DIY Small Pallet Shed: A Step-by-Step Guide for Beginners
Constructing a small shed from reclaimed pallets offers a budget-friendly and environmentally conscious alternative to purchasing pre-fabricated structures. This guide provides a comprehensive, step-by-step approach for beginners, emphasizing safety and detailed instructions to ensure a successful project. It is crucial to remember that safety should always be the paramount concern throughout this process.
Phase 1: Planning and Preparation
1.1 Assessing Your Needs and Site Selection:
Before commencing any construction, careful planning is essential. Determine the purpose of your shed. Will it store gardening equipment, tools, or other items? This will dictate the required size and internal layout. Consider the dimensions carefully, ensuring the shed’s footprint is appropriate for your available space. Choose a level, stable location that provides adequate drainage to prevent water accumulation around the base of the shed. Check local building codes and regulations to ensure your shed complies with any relevant ordinances.
1.2 Gathering Materials and Tools:
Sourcing reclaimed pallets requires careful inspection. Select pallets that are structurally sound, free from rot, significant damage, or pest infestation. Ensure the wood is treated appropriately for outdoor use. The number of pallets required will depend on the desired shed dimensions. It's advisable to acquire extra pallets to account for potential damage or imperfections during construction. Beyond the pallets, you will need:
- Foundation materials: Concrete blocks, gravel, or a suitable alternative depending on your chosen base.
- Fasteners: Galvanized screws and nails of varying lengths, suitable for outdoor use and capable of penetrating the pallet wood effectively.
- Wood preservative and sealant: To protect the wood from the elements and prolong the shed's lifespan. Choose a product designed for outdoor use and apply according to the manufacturer’s instructions.
- Measuring tools: Tape measure, level, and square to ensure accuracy throughout the construction process.
- Power tools (optional but recommended): Drill/driver, circular saw, jigsaw (for more precise cuts).
- Safety equipment: Safety glasses, work gloves, hearing protection (if using power tools).
- Roofing materials: Tarpaulin, corrugated metal sheeting, or asphalt shingles depending on your budget and aesthetic preference.
- Optional additions: Hinges, a latch or padlock for the door, windows for ventilation.
1.3 Preparing the Pallets:
Inspect each pallet thoroughly for any loose boards, nails, or protruding hardware. Remove any loose or damaged components. Clean the pallets using a wire brush or pressure washer to remove dirt and debris. If necessary, sand down any rough edges or splinters to prevent injuries during construction. Consider pre-treating the wood with a wood preservative to enhance durability before assembling the shed.
Phase 2: Construction
2.1 Creating the Foundation:
Construct a level base for your shed. This can be achieved using concrete blocks, a gravel base, or a similar approach. Ensure the base is large enough to accommodate the footprint of your shed and is level to prevent the structure from settling unevenly. Proper drainage around the base is crucial to prevent water damage.
2.2 Assembling the Walls:
Begin by assembling the walls using the reclaimed pallets. Determine the desired height of your shed and arrange the pallets accordingly. Secure the pallets together using galvanized screws or nails, ensuring sufficient overlap for strength and stability. Use a level to ensure the walls remain plumb and square throughout the assembly process. Consider bracing the walls during assembly to maintain their shape and prevent warping.
2.3 Constructing the Floor:
Once the walls are assembled, construct the floor. This can be achieved using additional pallets or plywood. Ensure the floor is level and securely attached to the base of the walls. Consider adding a layer of plywood on top of the pallet floor for added protection and a more finished appearance.
2.4 Building the Roof:
The roof design will depend on the size and style of your shed. A simple gable roof is relatively easy to construct. You can use additional pallets or other suitable roofing materials to create the roof structure. Ensure the roof is adequately sloped to facilitate water runoff. Secure the roofing material to the frame using appropriate fasteners. Consider adding a layer of waterproof membrane beneath the roofing material to further enhance protection against the elements.
2.5 Adding Doors and Windows (Optional):
If desired, incorporate a door and/or windows into the shed’s design. Carefully plan the placement and dimensions of these features. Use suitable hinges and latches to ensure secure operation. Measure precisely and cut the openings accurately to ensure a proper fit.
Phase 3: Finishing Touches and Maintenance
3.1 Applying a Protective Finish:
Apply a wood preservative and sealant to all exposed wood surfaces. This will protect the wood from weathering, insects, and decay, significantly extending the shed’s lifespan. Allow sufficient drying time between coats as recommended by the manufacturer. Consider applying multiple coats for optimal protection.
3.2 Final Inspections and Adjustments:
Once the sealant has dried, conduct a thorough inspection of the entire structure. Check for any loose screws, gaps, or areas requiring further attention. Make necessary repairs or adjustments. Ensure all components are secure and structurally sound.
3.3 Ongoing Maintenance:
Regular maintenance is crucial to prolong the shed's lifespan. Inspect the structure periodically for any signs of damage or decay. Address any issues promptly. Re-apply sealant as needed to maintain protection against the elements. Keep the area around the shed clear of debris and vegetation to prevent moisture build-up and pest infestations.
Building a small pallet shed is a rewarding project that combines practicality with environmental responsibility. By following these detailed instructions and prioritizing safety, you can successfully construct a durable and functional storage solution for your needs. Remember to always prioritize safety and consult with professionals if you encounter any challenges beyond your expertise.
How to Build a Lean-To Shed: Easy Plans for a Functional Shed
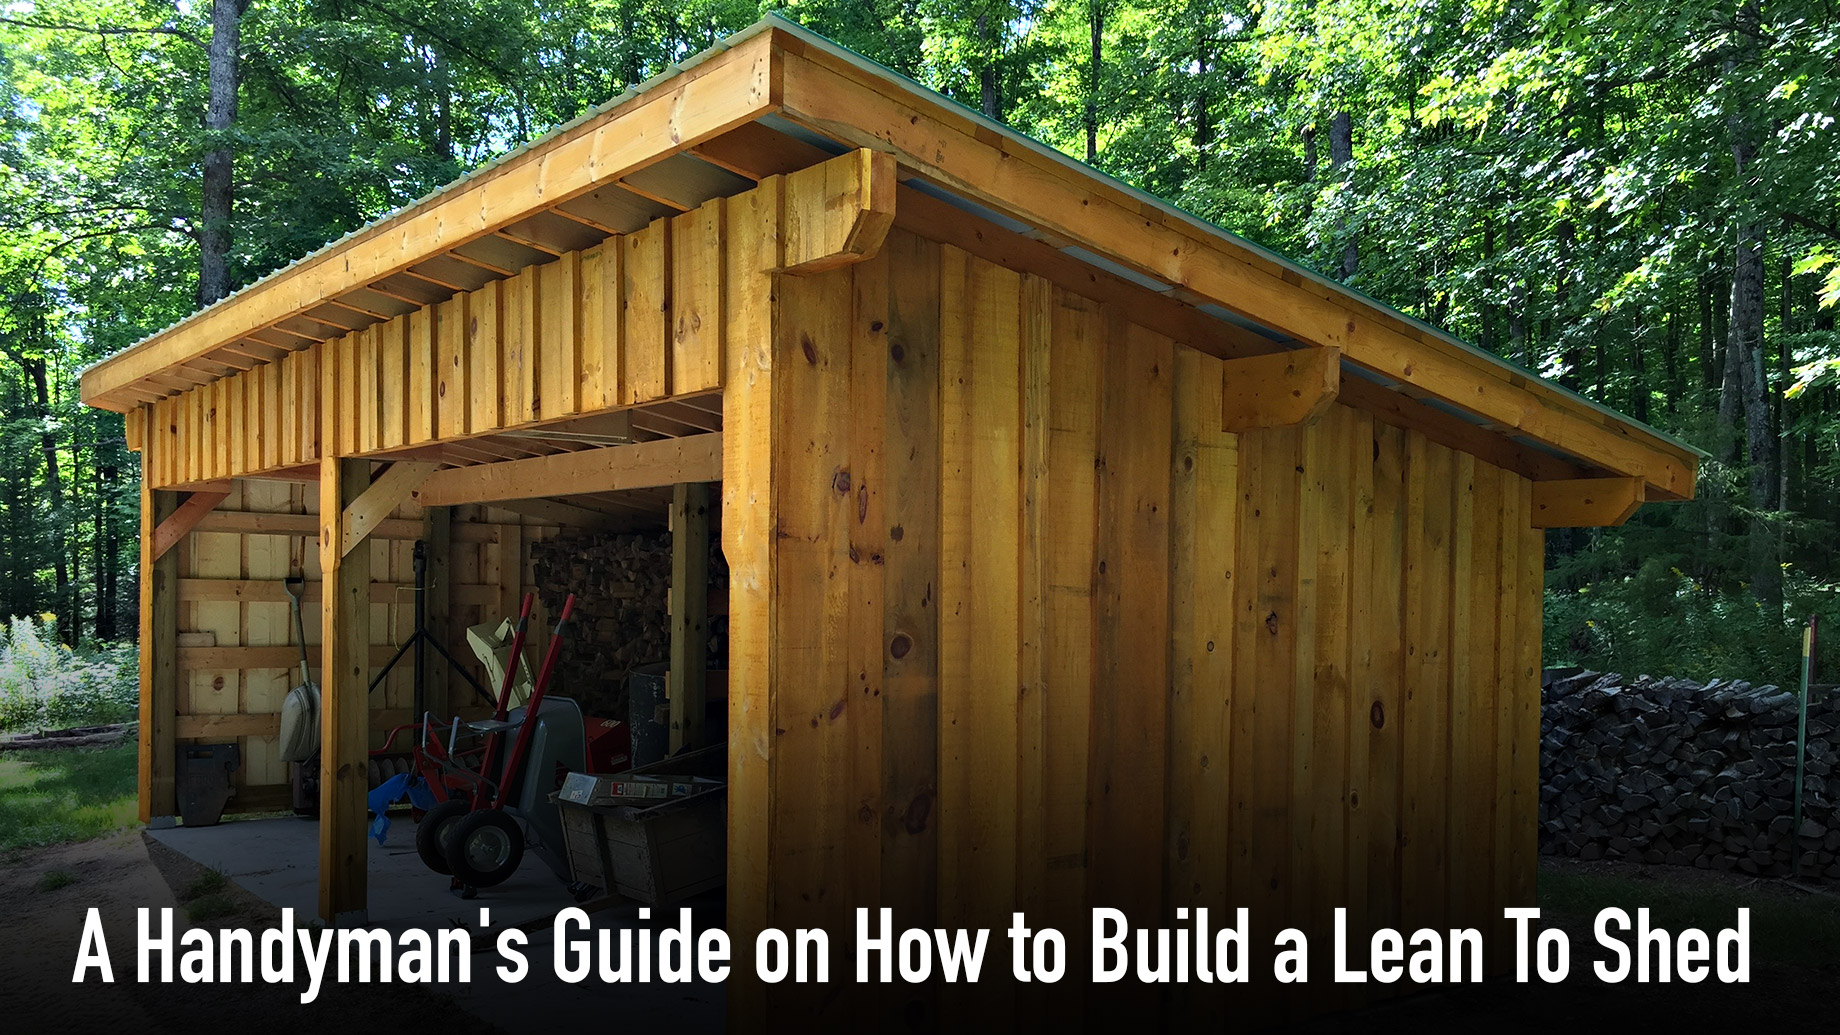
How to Build a Lean-To Shed: Easy Plans for a Functional Shed
So, you're thinking about building a lean-to shed? Fantastic! It's a surprisingly achievable project that can add tons of valuable storage space to your property without breaking the bank or requiring advanced carpentry skills. This guide will walk you through the process, step-by-step, in a way that even a complete beginner can understand. Let's get started!
Planning Your Lean-To Shed
Before you even pick up a saw, careful planning is key. This will save you headaches and potential costly mistakes down the line. Think about these things:
1. Location, Location, Location!
Where will your lean-to go? Consider proximity to your house (for easy access), existing structures (for support), and sunlight exposure (for ventilation and dryness). Ensure it complies with any local building codes or HOA regulations.
2. Size Matters
How much storage do you need? A smaller lean-to is quicker and cheaper to build. Sketch out a basic plan, noting the desired length and width. Remember to account for the thickness of the materials when calculating the overall dimensions.
3. Materials List
This is where you'll compile everything you'll need. A comprehensive list prevents mid-project scrambling to the hardware store. Here's a general list; the specifics will depend on your design:
- Pressure-treated lumber (for the foundation, frame, and roof)
- Plywood or OSB (for sheathing the walls and roof)
- Roofing material (shingles, metal, etc.)
- Nails, screws, and other fasteners
- Level, measuring tape, saw (circular saw or hand saw), hammer, drill, safety glasses, and work gloves
- Optional: Concrete blocks or a concrete foundation (depending on your location and desired permanence)
- Optional: Exterior siding (for a more finished look)
Building the Foundation
A solid foundation is crucial for a stable and long-lasting lean-to. Your options depend on your budget and the ground conditions.
1. Concrete Slab (Most Durable)
This is the most robust option, but requires more time and effort. You'll need to excavate, pour a concrete slab, and let it cure properly before proceeding.
2. Concrete Blocks (Simple and Cost-Effective)
Laying a base of concrete blocks is a much simpler alternative. Level the ground first, then lay the blocks, ensuring they're level and aligned.
3. Directly on the Ground (Least Durable)
For temporary lean-tos or in areas with well-drained soil, you might get away with placing the frame directly on the ground. However, consider using pressure-treated lumber to prevent rot.
Framing the Lean-To
The frame provides the structure for your shed. This is where accuracy is important.
1. Building the Walls
Depending on your design, you might only need one wall. Cut and assemble the wall framing using pressure-treated lumber, ensuring all corners are square and plumb. Use a level frequently!
2. Constructing the Roof
Lean-tos have a simple, sloping roof. Attach the rafters to the top plate of the wall(s) and the supporting structure (your house or another building). Ensure the rafters are evenly spaced and have sufficient slope to allow for proper water runoff.
Sheathing and Roofing
Now it's time to enclose your lean-to and make it weatherproof.
1. Sheathing the Walls and Roof
Attach plywood or OSB sheathing to the walls and roof framing. This will provide a solid base for the roofing material and help protect the structure from the elements. Secure the sheathing with appropriate nails or screws.
2. Installing the Roofing Material
This step depends on your chosen roofing material. Shingles, metal roofing, and even tarps are options. Follow the manufacturer's instructions for installation. Ensure proper overlapping to prevent leaks.
Finishing Touches
Once the structure is complete, there are a few finishing touches that can enhance its functionality and appearance.
1. Adding a Door
Cut an opening in one of the walls and install a door. Consider a simple, sturdy door that's easy to open and close.
2. Installing a Floor
This step isn't always necessary, but it greatly enhances the shed's usability. You can lay down concrete, plywood, or even just gravel depending on the shed’s purpose.
3. Painting or Staining
Applying a coat of paint or stain will protect your lean-to from the elements and give it a more polished look. Choose an exterior-grade paint or stain that's appropriate for the climate.
Commonly Asked Questions
Here are some common questions people ask about building lean-to sheds:
1. Do I need a building permit?
Possibly. Building codes vary by location. Check with your local authorities to determine if a permit is required before starting the project.
2. How long does it take to build a lean-to shed?
It depends on the size and complexity. A simple lean-to can be built in a weekend, while a larger or more elaborate one might take several days or even a week.
3. How much does it cost to build a lean-to shed?
The cost varies greatly depending on materials and size. You can build a basic lean-to for a few hundred dollars, while a more substantial one could cost several thousand.
4. Can I build a lean-to shed myself?
Absolutely! With careful planning and attention to detail, building a lean-to shed is a manageable DIY project, even for beginners. Take your time, follow the instructions carefully, and don't hesitate to ask for help if needed.
Building your own lean-to shed is a rewarding experience. You'll gain valuable skills and end up with a practical addition to your property. Remember to prioritize safety throughout the process, and enjoy the satisfaction of creating something with your own two hands!
Wood Pallet Shed DIY: A Sustainable, Affordable Solution for Your Yard

Wood Pallet Shed DIY: A Sustainable, Affordable Solution for Your Yard
Tired of clutter overflowing your garage or shed? Yearning for extra storage space without breaking the bank? Building your own shed from reclaimed wood pallets offers a surprisingly simple and eco-friendly solution. This project allows you to flex your DIY muscles, unleash your creativity, and contribute to a more sustainable lifestyleâ€"all while saving money. Forget expensive pre-fabricated sheds; let's explore how you can construct your own unique and functional pallet shed.
Planning Your Pallet Shed Project
Before you even touch a hammer, careful planning is essential. Start by determining the size and location of your future shed. Consider factors like available space in your yard, local building codes (check for permit requirements!), and the overall style you envision. Sketch out a basic design, paying attention to door placement, window options (if desired), and the roof structure. Next, gather your materials. You'll need a substantial number of sturdy, treated palletsâ€"inspect them thoroughly for rot, damage, or embedded nails. Remember, the quality of your pallets directly impacts the longevity of your shed.
Gathering Your Supplies
Beyond pallets, you’ll need a range of tools and materials. This includes: Measuring tape, level, saw (circular saw recommended), hammer, nails (various sizes), screws, screwdriver, drill, safety glasses, work gloves, a strong foundation (concrete blocks or a similar base), roofing material (tar paper, shingles, or corrugated metal), and weatherproofing sealant. Consider purchasing a pallet jack to make moving heavy pallets easier. If you’re adding features like windows or a door, source those materials beforehand as well. Remember to account for any additional materials needed for interior shelving or organization.
Construction: Building Your Pallet Shed
With your plan and materials ready, the construction phase begins. First, prepare a level foundation. Concrete blocks provide a simple, stable base. Next, you’ll begin assembling the pallet walls. Carefully disassemble the pallets, removing any loose or damaged boards. Then, use screws and/or nails to construct sturdy walls. Ensure the pallets are aligned and the structure is square. Consider using longer screws for added strength. The walls should be built in sections before raising them onto the foundation. Remember safety first; always wear safety glasses and gloves, and be mindful of protruding nails.
Roofing and Finishing Touches
Once the walls are up, construct the roof frame. This may involve cutting and assembling additional lumber to create a gable or shed-style roof. Then, cover the frame with roofing felt or tar paper for weather protection, followed by your chosen roofing material. This step is critical for protecting your shed from the elements. Once the roof is complete, add your door (consider using a pre-hung door for simplicity) and any windows you planned for. Finally, apply a weatherproofing sealant around the edges of the roof, doors, and windows to prevent leaks and extend the shed's lifespan. Consider adding a simple coat of paint or stain to personalize the look and further protect the wood from the elements.
Sustainability and Cost Savings
Building a pallet shed is a significantly sustainable choice. You're repurposing discarded materials, reducing landfill waste, and avoiding the environmental impact of manufacturing a new structure. The cost savings are substantial too. Reclaimed pallets are often free or very inexpensive, dramatically reducing the overall project expense compared to buying a pre-built shed. While you'll need to invest in tools and some additional materials, the overall cost remains considerably lower.
Beyond the Basics
Don't limit your creativity! Add personal touches to your pallet shed. This could involve installing shelving, adding a work surface, painting a unique design, or even incorporating reclaimed materials beyond pallets. With a little imagination, you can create a truly unique and functional storage solution that reflects your personal style while benefiting the environment.
Saturday, November 16, 2024
Create a Functional Lofted Shed with These 12x20 Building Plans

Unlocking the Potential: Your 12x20 Lofted Shed Masterplan
Hey there, fellow DIY enthusiasts! So you've got your eye on a 12x20 lofted shed â€" fantastic choice! These beauties offer a surprising amount of space and versatility, perfect for everything from a home workshop to a charming guest retreat (okay, maybe *slightly* cramped, but charming!). Let's dive into how you can make your 12x20 dreams a reality. This isn’t just about throwing up four walls and a roof; we’re talking about creating a functional, beautiful space you’ll actually *love* spending time in.Planning Your Perfect 12x20 Lofted Shed
Before you even think about touching a hammer, let's get organized. Seriously, this is the most important step. A poorly planned shed is a headache waiting to happen. We’re aiming for smooth sailing here.Location, Location, Location!
Where are you going to put this magnificent structure? Consider:- Accessibility: Will you need easy access for vehicles to deliver materials? Will you need a clear path to your shed all year round, especially if you live in a snowy region?
- Sunlight: Do you want a bright, sunny space or something a little more shaded? Think about the direction of the sun throughout the day.
- Utilities: Will you need electricity, water, or even internet access? Knowing this upfront will impact your foundation and electrical planning.
- Local Regulations: Check with your local council or homeowner's association about any building permits, setback requirements, or height restrictions. Trust me, this is a crucial step, you don't want to build it all and have to tear it down!
Designing Your Dream Shed
Now for the fun part! Let’s brainstorm the layout. A 12x20 space allows for some serious creativity. Consider:- Workshop Area: If it's a workshop, plan for workbench space, adequate lighting, storage for tools, and potentially a dedicated area for dust collection.
- Storage Space: Think about shelving, cabinets, and potentially even a built-in closet system. How will you organize your stuff? Vertical space is your friend in a shed!
- Loft Access: How will you get up to the loft? A sturdy ladder, a staircase (if space allows), or a retractable staircase? Safety is paramount here.
- Loft Usage: What’s the loft for? Seasonal storage? A relaxing reading nook? A spare room for guests or maybe even a small home office (if you have the right insulation)? The possibilities are endless!
- Doors and Windows: Consider the number and placement of doors and windows for ventilation, light, and easy access.
Building Your 12x20 Lofted Shed: A Step-by-Step Guide (In a Nutshell!)
Okay, buckle up, because we're about to get a bit technical (but not *too* technical!). This isn't a comprehensive building guide, but more of a roadmap to help you navigate the process. Always consult detailed plans and instructions specific to your chosen building method and materials.Foundation
A solid foundation is key. Your options include:- Concrete Slab: The most durable and level option, but also the most expensive and labor-intensive.
- Gravel Base with Pressure-Treated Skids: A cost-effective and relatively simple solution, perfect for less demanding sheds.
Framing
This involves building the walls and roof structure. Pay close attention to squareness and levelness at each stage. A slight error early on can snowball into major problems later.Sheathing and Roofing
Once the framing is complete, you'll add sheathing (plywood or OSB) to the exterior walls and roof. Then, it's time for roofingâ€"shingles, metal, or whatever suits your style and budget.Siding and Trim
This is where your shed starts to look like a shed! Choose siding that complements your home or landscape. Don’t forget the finishing touches like trim and fascia boards.Interior Finishes
This is where you really personalize your shed. Drywall, paneling, or even shiplap can transform the space. Don’t forget insulation to regulate temperature!Loft Construction
Building the loft involves creating floor joists, sheathing the floor, and adding railings for safety. Remember to reinforce the supporting structures for the weight of whatever you plan to store up there.Essential Considerations for your 12x20 Lofted Shed
Ventilation
Proper ventilation is crucial, especially if you plan to use your shed as a workshop. Install vents in the walls and roof to prevent moisture buildup and improve air quality.Insulation
If you want to use your shed year-round, insulation is a must. This will help regulate temperature and make the space more comfortable.Electrical Wiring
If you're planning on adding electricity, make sure you hire a qualified electrician to ensure it's done safely and up to code. Safety first, people!Frequently Asked Questions (FAQs)
Q: How much does a 12x20 lofted shed cost?
A: The cost varies greatly depending on materials, finishes, and whether you hire professionals or do it yourself. Expect to spend anywhere from a few thousand to tens of thousands of dollars.
Q: How long does it take to build a 12x20 lofted shed?
A: This depends on your experience, the complexity of the design, and your availability. Expect it to take several weeks, even months if you're doing it yourself part-time.
Q: Do I need a building permit?
A: Absolutely check with your local authorities. Permit requirements vary depending on your location and the size and features of your shed.
Q: Can I build a 12x20 lofted shed myself?
A: Yes, with proper planning, research, and the right tools, you can certainly tackle this project yourself. However, if you're not confident in your DIY skills, it might be wise to hire professionals for certain aspects of the construction.
Q: What kind of foundation do I need?
A: The best foundation depends on your soil conditions and budget. Options include a concrete slab, a gravel base with pressure-treated skids, or even piers if your ground is particularly uneven.
There you have it! Your comprehensive guide (well, a pretty good start anyway!) to building your own 12x20 lofted shed. Remember, proper planning and attention to detail are key to a successful project. Happy building!Monday, November 11, 2024
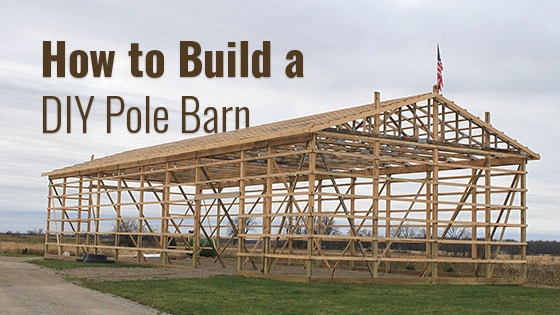
How to Build a Pole Barn with Galvanized Steel Posts
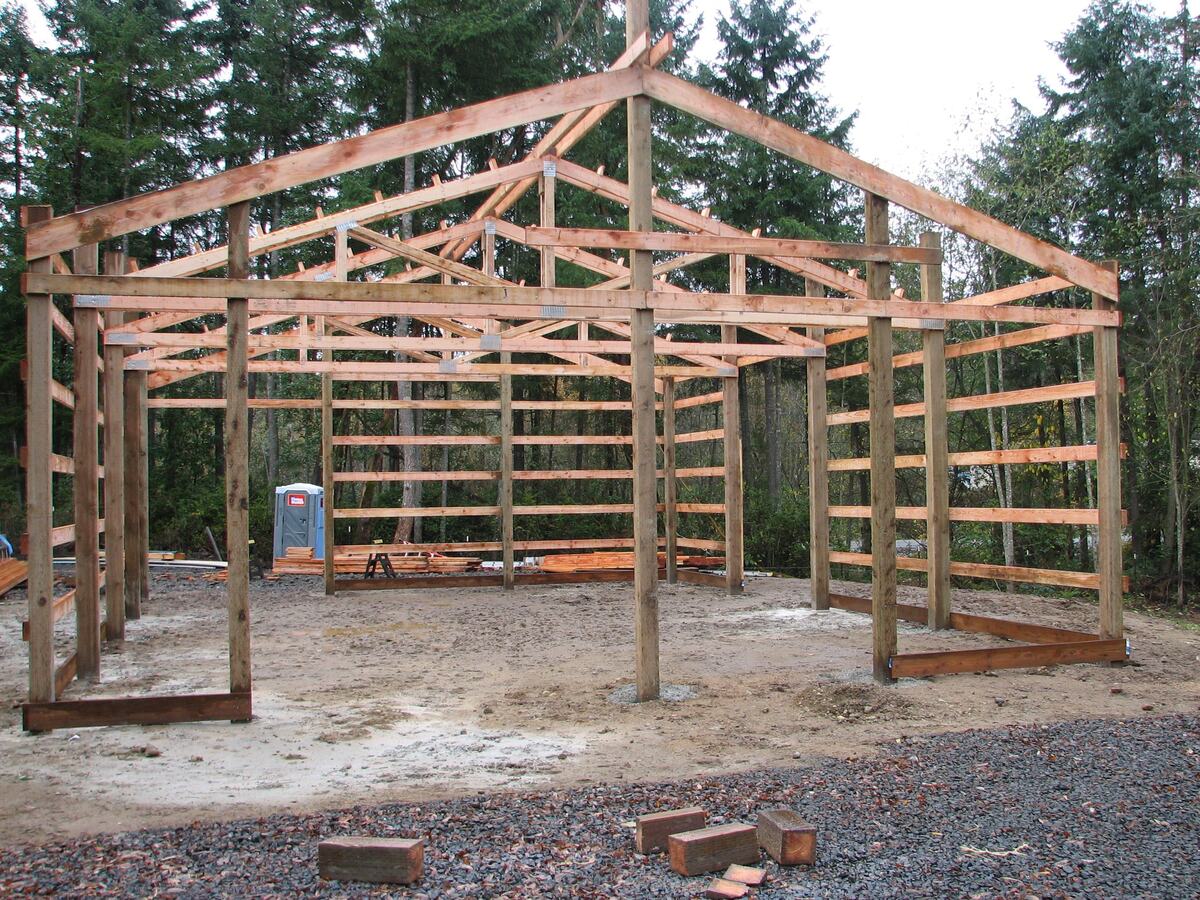
Pole barns, renowned for their versatility and cost-effectiveness, have become a popular choice for various purposes. From housing livestock to storing equipment, these structures offer a sturdy and adaptable solution. While traditional wood posts are common, galvanised steel posts provide a more durable and long-lasting alternative, offering enhanced resistance to the elements and pests. This comprehensive guide will walk you through the process of building a pole barn with galvanized steel posts, equipping you with the knowledge and steps necessary for a successful construction project.
1. Planning and Design
a. Purpose and Size:
Before embarking on the construction, meticulously plan the purpose and size of your pole barn. Consider the intended usage, such as housing livestock, storing equipment, or providing workshop space. Determine the required dimensions, including length, width, and height, to ensure adequate space for your needs.
b. Site Selection and Preparation:
Choose a level and well-drained site for your pole barn. This ensures stability and minimizes potential problems with water accumulation. Clear the area of debris, vegetation, and any obstacles.
c. Building Codes and Permits:
Consult local building codes and regulations to determine the requirements for pole barn construction in your area. Obtain necessary permits and ensure your plans comply with all applicable codes. This includes requirements for foundation, wind load, and snow load specifications.
2. Foundation Design and Installation
a. Foundation Type:
Pole barn foundations commonly employ concrete piers, concrete footings, or a combination of both. Concrete piers offer greater stability and load-bearing capacity, while concrete footings are suitable for lighter loads and less demanding applications.
b. Pier Placement and Depth:
Determine the number and placement of piers or footings based on the size and load requirements of your pole barn. Use a tape measure and stakes to mark the locations accurately. The depth of the piers or footings should be below the frost line in your region, preventing heaving and shifting due to freezing and thawing.
c. Concrete Pouring and Curing:
Mix concrete according to manufacturer's instructions and pour it into the prepared foundation holes. Level the concrete and ensure it is adequately compacted. Allow sufficient curing time for the concrete to reach its full strength before proceeding to the next steps.
3. Galvanized Steel Post Selection and Installation
a. Post Size and Strength:
Choose galvanized steel posts with a diameter and wall thickness suitable for the intended loads and structural requirements. Refer to engineering specifications or consult with a structural engineer for guidance.
b. Post Placement and Alignment:
Align the galvanized steel posts precisely with the foundation piers or footings. Use a level and plumb bob to ensure verticality and accurate placement.
c. Post Anchoring and Bracing:
Secure the posts to the foundation using appropriate anchoring methods, such as concrete anchors or heavy-duty bolts. Install temporary bracing to stabilize the posts during construction.
4. Framing and Roofing
a. Framing System:
Build a robust framing system to support the roof and walls. Typically, this involves using timber or steel beams, purlins, and girts.
b. Roof Framing:
Construct the roof framing using trusses, rafters, or a combination of both, depending on the roof pitch and span. Ensure proper spacing and connections for structural integrity.
c. Roofing Material:
Choose a roofing material that meets your needs and budget. Options include metal roofing, asphalt shingles, or tile. Consider factors like weather resistance, aesthetics, and maintenance requirements.
5. Siding and Walls
a. Siding Material:
Select a siding material that complements the overall design and meets your desired aesthetic. Options include metal siding, wood siding, or vinyl siding.
b. Wall Framing and Sheathing:
Construct the wall framing using studs, joists, or a combination thereof. Apply sheathing over the framing to provide a solid base for the siding.
c. Insulation and Vapor Barrier:
Insulate the walls to improve energy efficiency and provide thermal comfort. Install a vapor barrier to prevent moisture build-up within the walls.
6. Doors and Windows
a. Door Placement and Size:
Decide on the location, size, and type of doors for your pole barn. Consider the intended use and traffic flow.
b. Window Placement and Design:
Select the size, style, and placement of windows to provide natural light and ventilation.
c. Installation:
Install the doors and windows according to manufacturer's instructions, ensuring proper sealing and weatherproofing.
7. Finishing Touches
a. Interior Finishes:
Choose interior finishes that suit the intended use of the pole barn. Options include drywall, plywood, or exposed beams.
b. Electrical and Plumbing:
Install electrical wiring and plumbing as needed, complying with all applicable codes and regulations.
c. Painting and Decoration:
Paint or stain the exterior and interior to enhance the appearance and protect the surfaces.
8. Safety Precautions
a. Personal Protective Equipment:
Always wear appropriate personal protective equipment (PPE) during construction, including safety glasses, gloves, and hard hats.
b. Tools and Equipment:
Use tools and equipment properly and ensure they are in good working condition.
c. Weather Conditions:
Avoid working in hazardous weather conditions, such as strong winds or heavy rain.
9. Maintenance and Repair
a. Regular Inspections:
Inspect your pole barn regularly for signs of damage or deterioration.
b. Maintenance Tasks:
Perform routine maintenance tasks, such as cleaning gutters, sealing cracks, and painting.
c. Repairs:
Address repairs promptly to prevent further damage and ensure the longevity of your pole barn.
Conclusion:
Building a pole barn with galvanized steel posts can be a rewarding and cost-effective project. By carefully planning, designing, and following the steps outlined above, you can construct a durable and versatile structure that meets your specific needs. Remember to prioritize safety throughout the construction process and engage professional help if required. With proper maintenance, your galvanized steel post pole barn will provide years of reliable service.
How to Build a Pole Barn for Your Agricultural Business
Hey there, fellow farmhands! You're probably reading this because you're thinking about building a pole barn. Maybe you need more storage space, want to expand your livestock operation, or just want a sturdy, low-maintenance structure for your equipment. Whatever the reason, pole barns are a fantastic choice for your agricultural needs. They're affordable, customizable, and can be put up relatively quickly.
But before you start digging holes, let's break down everything you need to know about building your own pole barn. We'll cover the basics, from planning and permits to construction and finishing touches. By the end, you'll have a good grasp on what's involved and be ready to embark on your own pole barn adventure.
Step 1: The Dream Stage - Planning Your Pole Barn Paradise
Building a pole barn starts with a clear vision of what you want. Ask yourself:
What will it be used for? Storage, livestock, workshop, or a combination? This will determine the size, layout, and features needed.
Where will it be located on your property? Consider access, utilities, drainage, and the surrounding landscape.
What's your budget? Be realistic about what you can afford, and factor in costs for materials, labor, and permits.
What features are essential? Doors, windows, lighting, electrical outlets, insulation, and ventilation are all important considerations.
Step 2: Don't Be a Rebel Without a Permit!
Building anything on your property often requires permits from your local municipality. Contact your building department to find out the specific requirements for pole barns in your area. They might ask for:
Site plan: Shows the location of the barn on your property.
Building plans: Detailed drawings of the structure, including dimensions, materials, and building codes.
Engineering drawings: Especially important for larger structures, ensuring structural stability.
Environmental permits: Depending on location, you may need permits for soil erosion control or wetland mitigation.
Step 3: Finding a Foundation - Getting Ready to Build
The foundation is the heart of your pole barn. It's what keeps the whole structure standing tall and strong. Here's a rundown of the main options:
Concrete piers: The most common and durable option, providing a solid base for your poles. They involve digging holes, pouring concrete, and installing anchor bolts.
Steel posts: A faster and more cost-effective alternative, often used for smaller structures. They require less labor and provide a sturdy foundation.
Wood posts: A more traditional option, but they require proper treatment to prevent rot and decay. They are often less expensive than concrete or steel but may not be as durable.
Step 4: Choose Your Lumber - The Backbone of Your Barn
The poles that support your barn need to be strong and durable. The best wood for pole barn construction includes:
Southern Pine: Known for its strength and affordability.
Douglas Fir: Strong and durable, with a beautiful reddish-brown color.
Redwood: Naturally resistant to rot and decay, but more expensive than other options.
Step 5: Putting It Together - The Construction Phase
Now for the fun part! Here's a simplified overview of the construction process:
1. Erect the poles: This is where having a helper or two comes in handy. Carefully position the poles according to your plans and secure them to the foundation.
2. Build the frame: Connect the poles with beams and rafters to create the main structure of the barn.
3. Add the roof: Choose your preferred roof material, whether metal, shingles, or even a green roof for energy efficiency.
4. Install the siding: Finish the exterior of the barn with wood, metal, or any other siding material you choose.
5. Add the finishing touches: Install doors, windows, lights, electrical outlets, and any other desired features.
Step 6: Making it Homey - Interior Finishing and Extras
Once the shell is built, you can personalize the interior to meet your needs:
Insulation: Keeps your barn warm in winter and cool in summer, improving comfort and energy efficiency.
Flooring: Choose concrete, wood, or even a combination depending on your needs.
Ventilation: Important for livestock and for keeping the air fresh and preventing moisture build-up.
Lighting: Adequate lighting is essential for working and visibility.
Other features: Consider adding lofts for storage, stalls for animals, or a workshop space.
Step 7: It's Time to Celebrate - Enjoy Your New Pole Barn!
After all the hard work, you'll finally get to enjoy the fruits of your labor. Your new pole barn is ready to serve as a safe, sturdy, and versatile addition to your agricultural operation.
Bonus Tip: Seeking Professional Help
Building a pole barn is a significant project. While you can tackle many aspects yourself, don't hesitate to hire professional contractors for specific tasks, such as:
Foundation work: Ensuring a solid and properly installed foundation is critical.
Roofing: Hiring experienced roofers ensures proper installation and longevity.
Electrical work: Professional electricians can safely install wiring and electrical fixtures.
Conclusion
Building a pole barn is a fulfilling and rewarding endeavor. With careful planning, attention to detail, and a little elbow grease, you can create a structure that meets your agricultural needs for years to come. Remember, it's your farm, so make it your own. Choose materials you like, personalize the design, and enjoy the process of building your own "farm fortress."
Now, get out there and start planning!
How to Construct a Pole Barn for a Workshop or Storage
Alright, you're ready to ditch the cramped garage and build your very own workshop or storage space. A pole barn is the perfect solution - it's affordable, customizable, and quick to erect. You might be thinking, "Building a barn? That sounds complicated!" But trust me, it's not as intimidating as you think.
Let's break this down into manageable chunks, like a good carpenter does with their lumber.
First, Get Your Planning On
Before you even think about digging a hole, you need a solid plan.
1. Design and Size: What's the purpose of your pole barn? Workshop? Storage? A space for your weekend projects? This will determine the size you need. Don't be shy, go big if you can! You'll thank yourself later when you have ample space for all your tools and projects.
2. Location, Location, Location: Think about where your barn will fit best. Is it close enough to utilities? Are there any trees or other obstacles in the way?
3. Materials and Construction: Do you want traditional wooden posts or steel ones? What kind of siding and roofing? Decide on your budget and the materials that fit best.
The Foundation: The Bedrock of Your Barn
Now, let's talk about the foundation. This is the crucial part that keeps your barn sturdy and standing tall.
1. Concrete Pier Foundation: This is a popular choice for pole barns. You'll be digging holes and pouring concrete to create sturdy piers that support your posts. You can choose from different sizes and configurations to accommodate your barn's weight and size.
2. Concrete Slab Foundation: If you want a more solid floor, you can go for a concrete slab foundation. This is more expensive but provides a level and durable floor for your workshop.
The Posts: The Backbone of Your Structure
Next up, the posts - the vertical supports that hold up your entire barn.
1. Choosing the Right Material: Wooden posts are typically pressure-treated to resist rot and moisture. Steel posts are a more modern and durable option.
2. Post Size and Spacing: The size and spacing of your posts depend on the size and weight of your barn. Check local building codes and consult with a structural engineer for advice.
3. Installing the Posts: Once you've poured your concrete piers, you'll need to carefully install the posts on top. Make sure they are level and plumb before the concrete sets.
The Walls and Roof: Putting a Cover Over Your Creations
We're nearing the finish line! Now it's time to build the walls and roof.
1. Framing the Walls: Connect your posts with horizontal beams and wall studs. You can choose from different types of siding, from traditional wood to metal or vinyl.
2. Roof Construction: The roof is where you get creative. You have options for pitched roofs, gambrel roofs, or even a simple flat roof. Don't forget to add insulation for better temperature control.
3. Roof Covering: Choose a material that suits your style and budget. Metal roofing is a popular choice for pole barns due to its durability and affordability. Shingles are another option.
Doors and Windows: Bringing in the Light (and Access)
Let's talk about doors and windows. After all, you want your workspace to be welcoming and well-lit.
1. Doors: The Grand Entrance: Choose a door size and style that suits your needs. Double doors are great for bringing in large items or tools.
2. Windows: Bringing in the Light: Consider adding windows to your workshop for natural light. This can also help with ventilation. You can choose from different styles and sizes based on your preference.
The Finishing Touches: Making It Your Own
Now comes the fun part - adding the finishing touches to make your pole barn truly your own.
1. Insulation: Insulating your barn will improve its energy efficiency and keep it comfortable year-round.
2. Electrical Wiring: You'll need to have electricity for your tools and lighting. Run the wiring according to local codes and safety standards.
3. Interior Finish: Add a layer of drywall or plywood to the interior walls. You can paint them or add other finishes.
It's Time to Get Building!
You've got the plan, the materials, and the know-how. Now it's time to get your hands dirty! Remember, building a pole barn is a lot of work, but the satisfaction of creating your own space is worth it.
A Few Tips for Success:
Safety First: Always wear safety gear like gloves, safety glasses, and hearing protection.
Take Your Time: There's no need to rush. Building a pole barn is a process, so take your time and do it right.
Ask for Help: Don't be afraid to ask for help from friends or family. A helping hand can make the process a lot easier.
Have Fun!: Building your own pole barn is a rewarding experience. Enjoy the process and take pride in your accomplishment.
So, are you ready to embark on your pole barn adventure? With some careful planning and a little hard work, you'll soon be enjoying your own workshop or storage space. And remember, the possibilities are endless! You can customize it to fit your exact needs and style. Go out there and build something amazing! You've got this!
DIY Pole Barn: How to Build It Fast and Efficiently

Building a pole barn offers a practical and cost-effective solution for various needs, from housing livestock to storing vehicles and equipment. This guide provides a comprehensive overview of the construction process, emphasizing efficiency and speed while maintaining quality and structural integrity.
1. Planning and Preparation: Laying the Foundation for Success
Before embarking on the construction journey, meticulous planning is crucial.
a. Define Your Needs and Purpose: Determine the specific requirements of your pole barn, considering its intended use, size, and desired features.
b. Site Selection and Permitting: Choose a suitable location with adequate access and utilities. Obtain the necessary permits from your local authorities.
c. Design and Engineering: Consult with a qualified engineer or architect to create a detailed design plan that meets local building codes and ensures structural stability. Consider factors like wind load, snow load, and soil conditions.
d. Material Selection and Budgeting: Research different materials and compare costs. Choose high-quality, durable materials that align with your budget.
e. Tools and Equipment: Compile a comprehensive list of tools and equipment required for the project. Consider renting or borrowing specialized tools to reduce costs.
2. Setting the Posts: Establishing a Solid Base
The foundation of your pole barn is critical to its longevity.
a. Excavation and Foundation Preparation: Dig post holes to the required depth, taking into account frost lines and soil conditions. Install concrete footings or piers at the bottom of each hole for stability.
b. Post Selection and Installation: Choose sturdy treated lumber or steel posts for optimal durability. Ensure the posts are plumb and leveled before securing them to the footings using concrete or specialized post anchors.
c. Bracing and Stabilizing: Install diagonal bracing between the posts to provide lateral stability and reinforce the structure against wind and other forces.
3. Framing the Roof: A Key Element of Strength and Protection
a. Truss Design and Construction: Select prefabricated or custom-built roof trusses based on your design. Install them securely onto the posts, ensuring proper spacing and alignment.
b. Sheathing and Roofing Material: Attach plywood sheathing to the trusses to create a stable roof surface. Choose roofing material that meets your budget and desired aesthetic.
c. Gable End Framing: Install framing for the gable ends, attaching it to the posts and trusses.
4. Erecting the Walls: Enclosing the Structure
a. Wall Framing: Install vertical wall studs onto the posts, ensuring proper spacing and alignment. Use a level and plumb line to maintain accuracy.
b. Sheathing and Siding: Attach sheathing to the wall studs for insulation and exterior cladding. Choose siding material that complements your design and offers desired durability.
c. Windows and Doors: Install windows and doors according to the design plan. Consider energy efficiency and security features when making selections.
5. Finishing Touches: Enhancing Functionality and Aesthetics
a. Interior Finishes: Add insulation to the walls and ceiling for thermal efficiency. Apply drywall or other interior finishes as desired.
b. Exterior Finishes: Paint or stain the exterior to enhance protection and improve aesthetics. Consider adding trim and decorative elements for a finished look.
c. Electrical and Plumbing: Install electrical wiring and plumbing systems according to local codes and regulations.
6. Tips for Speed and Efficiency
a. Utilize Pre-Cut Materials: Consider using pre-cut lumber and components to reduce onsite cutting and waste.
b. Invest in Quality Tools: Employ quality tools and equipment for efficient and accurate construction.
c. Plan for Efficiency: Organize tools and materials to minimize wasted time and movement.
d. Utilize Labor-Saving Techniques: Explore techniques like post hole diggers and motorized lifts to expedite certain tasks.
e. Prioritize Safety: Always prioritize safety by wearing appropriate protective gear and adhering to safety regulations.
7. Conclusion: A Successful DIY Pole Barn Project
By following this comprehensive guide, you can achieve a well-constructed pole barn within a reasonable timeframe. Remember to prioritize quality materials, meticulous planning, and attention to detail. With careful execution and commitment to efficiency, you can create a valuable addition to your property that serves your specific needs for years to come.
Sunday, November 10, 2024
Expert advice for choosing 10x12 storage shed plans
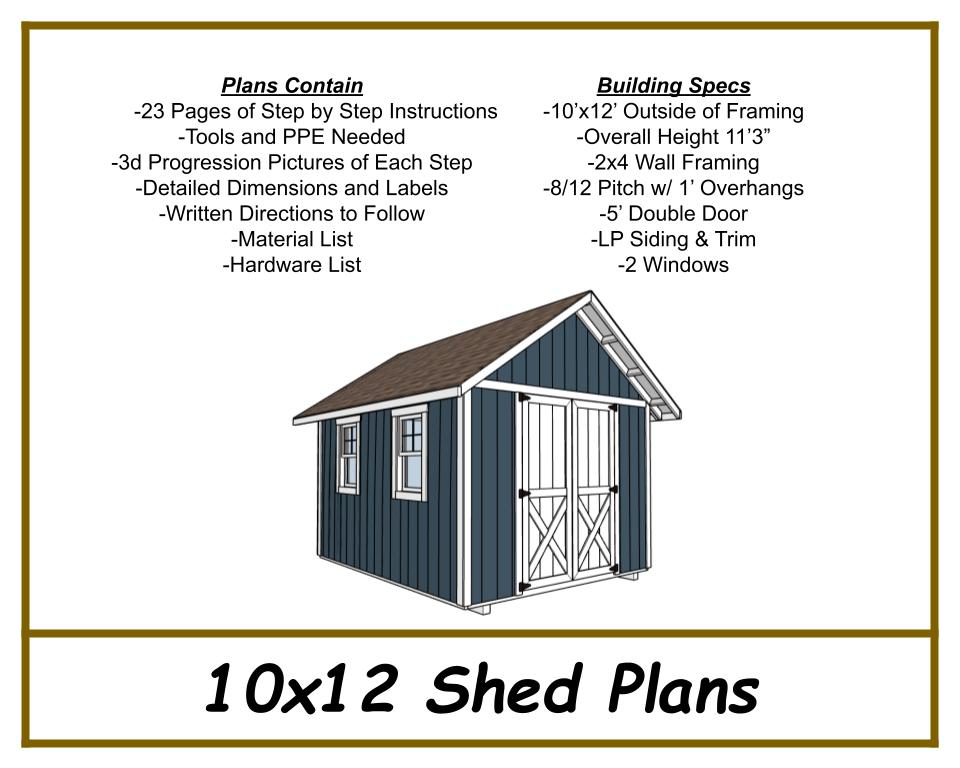
Hey there, shed-seekers! So, you've decided to tackle the great storage shed quest. Good for you! But with all those 10x12 plans out there, where do you even begin? Don't worry, you've come to the right place.
Let's be honest, picking a shed is a lot like choosing a new pair of jeans: you want something that fits your needs perfectly, looks good, and lasts a long time. So, buckle up and let's dive into the world of 10x12 storage shed plans.
First Things First: What Are You Storing?
Think about what's going to be living in your shed. Do you have a collection of vintage snowmobiles? Maybe a surplus of garden tools? Or are you planning on using it as a creative workshop? The answer to this question will guide your decision-making process.
The Basic Essentials: Let's Talk Building Materials
Wood: Classic, affordable, and easy to work with. But be prepared to paint or stain it regularly.
Metal: Super sturdy and low maintenance, but can get hot in the summer.
Vinyl: Low maintenance and comes in a variety of colors. It's a good choice if you're looking for a shed that's resistant to fading and moisture.
Let's Talk Roofing: More Than Just a Cover
Shingles: Durable and affordable, they're a popular choice.
Metal: Durable and long-lasting. Metal roofing can also help keep your shed cool in the summer.
Rubber: Low-maintenance and water-resistant. This is a good option if you're looking for a shed that's eco-friendly.
The Foundation: Supporting Your Dream Shed
Concrete: The most durable option and can handle heavy loads.
Wood: A less expensive option, but it might need to be replaced over time.
Gravel: An easy and affordable option for sheds that don't need to be heavy-duty.
Features: Adding the Finishing Touches
Windows: Let in natural light and improve ventilation.
Doors: Choose a door that's easy to open and close and fits your needs. Consider a double door if you're planning on storing large items.
Shelving: Maximize your storage space with shelves.
Workbenches: Perfect for those who want to use their shed as a workshop.
Electrical outlets: A necessity for powering tools and lighting.
Don't Forget About Permits!
Before you start building, check with your local building department about any permits you might need. This will save you time and potential headaches down the road.
The DIY Dilemma:
You've got two choices:
DIY: If you're handy and have some construction experience, building your own shed could save you some money.
Professional Installation: If you're not a DIYer or you're short on time, consider hiring a professional to build your shed.
Finding the Right Plans:
Now, for the fun part: finding the perfect plans! There are tons of resources available online and in stores, but here are a few tips:
Start your search online: Sites like Pinterest, Etsy, and Home Depot offer a wide variety of 10x12 storage shed plans.
Check out your local lumberyard: They often have a selection of plans available for purchase.
Don't be afraid to modify: If you find a plan you like but want to add or change something, don't be afraid to modify it!
Remember: This is Your Space!
The best shed is the one that perfectly suits your needs and personality. Take your time, do your research, and don't be afraid to think outside the box. After all, this is your space to create something truly special.
Good luck, shed-seekers! You've got this.
How to build a 10x12 shed for under $500
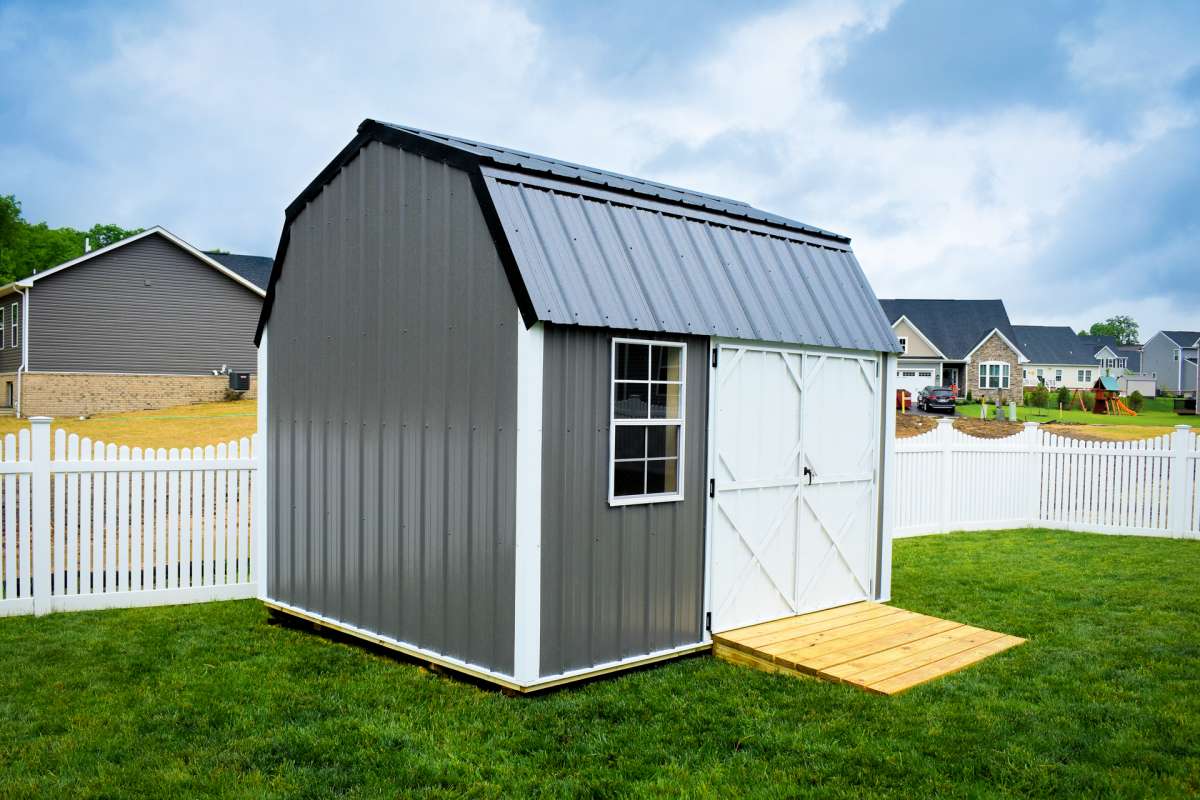
Hey there, fellow DIY enthusiasts! Ever dreamed of having a shed? A little haven for your tools, garden supplies, or maybe even a tiny workshop? You know what they say, "The only thing better than a shed is a shed you built yourself."
But hold up! We're on a budget here. Building a shed can be pricey, but I'm here to show you how to make it happen for under $500. It's not just about the cost, it's about the thrill of the build!
Planning is King:
The first step is to create a solid plan. We're talking about a 10x12 shed, so let's break it down:
Foundation: Forget the fancy concrete slabs. We're going simple. A well-prepared gravel base will be more than enough for our 10x12 shed.
Framing: Think 2x4s and 2x6s. We'll be using those for the walls, roof, and floor. You'll want to pick up some sturdy plywood for the roof and floor sheathing.
Siding: Time to get creative. You can go with budget-friendly options like vinyl siding or even use pressure-treated wood if you want a rustic look.
Roofing: Shingles are the way to go, and you can find decent ones for a good price. Don't forget to factor in some flashing for those pesky roof edges.
Door: A simple pre-hung door will save you time and effort. Look for good deals online or at your local lumber yard.
Windows: You can skip these altogether if you're on a tight budget, but a small window or two can add some natural light.
Where to Find the Best Deals:
Lumber Yards: Look for sales and clearance sections. You can often find good deals on slightly damaged or surplus lumber.
Online Marketplaces: Check sites like Craigslist, Facebook Marketplace, and even eBay. Sometimes you can find great deals on pre-owned or salvaged materials.
Second-Hand Stores: Don't underestimate those thrift stores! They might have some gems for your shed project.
Friends and Family: Ask around. Someone might have leftover materials from a previous project.
Getting Started:
Now that you have your plan and materials, let's get to work. Here's a step-by-step guide:
1. Clear the Space: Choose a flat, level area for your shed. Make sure to clear any debris and vegetation.
2. Create the Base: Prepare the gravel base. Level it carefully using a rake and a carpenter's level.
3. Building the Floor: Lay down the floor joists, spacing them according to code. Then, attach the plywood subfloor.
4. Framing the Walls: Construct the walls with 2x4 studs, making sure to include bracing for stability.
5. Raising the Walls: Carefully lift the walls into place and secure them to the floor.
6. Roof Framing: Construct the roof rafters and install them onto the wall plates.
7. Roof Sheathing: Attach the plywood sheathing to the rafters.
8. Adding the Siding: Install your chosen siding, working from the bottom up.
9. Roofing Time: Install the shingles, starting at the bottom and working your way up. Don't forget the flashing!
10. The Finishing Touches: Install the door, any windows you've chosen, and add any trim details.
Remember:
Safety first! Always wear safety glasses and gloves when working with tools and materials.
Don't skimp on building codes. Make sure your shed is constructed to meet local building standards.
Take your time and enjoy the process. Building a shed is a rewarding experience!
Additional Tips:
Don't Be Afraid to Ask for Help: If you're not comfortable with a certain task, ask a friend or family member for help.
Utilize Your Resources: There are plenty of online resources and YouTube videos that can guide you through the building process.
Get Creative with Design: Add some personality to your shed with paint, decorative accents, and landscaping.
Building a shed for under $500 is definitely achievable. It takes a little planning, some ingenuity, and maybe a bit of sweat equity. But the satisfaction of building something with your own two hands is worth every penny!
So, what are you waiting for? Get out there and build your dream shed!