Thursday, November 7, 2024
Simple diy garden shed plans for practical outdoor storage
Okay, so you're thinking about building a garden shed. I get it. You're tired of the lawnmower taking up precious space in the garage, and those gardening tools are starting to look like a jungle in the corner. Building a shed is a fantastic way to solve those storage problems and create a little oasis in your backyard.
Now, before you start envisioning yourself a master carpenter, let's be realistic. We're going for simple, folks. We're talking about a shed that's both practical and achievable, even if you've never built anything more complicated than a birdhouse.
Let's lay the groundwork (literally!):
1. Decide on a location: Think about how you'll access the shed, how close it is to power (if you need it), and the amount of sunlight it'll get.
2. Get your permit: Check with your local building department to see if you need a permit for your shed. It might seem like a hassle, but it's better to be safe than sorry.
3. Level the ground: This is super important for a sturdy shed. You can use a spirit level and a shovel to make the base as even as possible.
4. Choose your materials: Pressure-treated lumber is your best friend for a shed because it's resistant to rot and insects. You can choose between treated plywood or OSB for the sheathing.
Okay, now for the fun part!
Here's a basic plan to get you started (don't worry, we'll break it down):
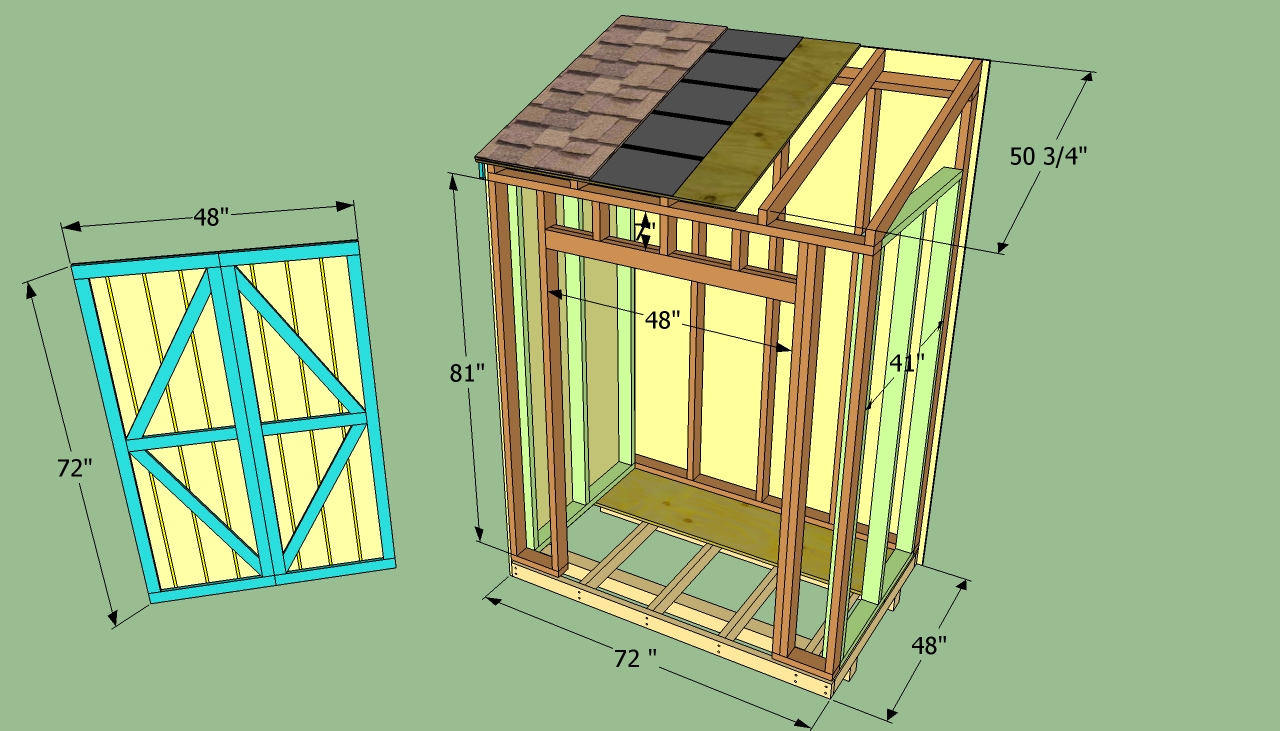
The foundation: This is the base of your shed. It can be as simple as a concrete slab or as fancy as a raised platform. For our DIY shed, we're going with a simple, cost-effective foundation using pressure-treated lumber.
The frame: This is the skeleton of your shed. It's made up of vertical studs and horizontal beams that give the shed its shape and support the roof. We'll use 2x4 lumber for this.
The walls and roof: These are the sheathing and roof boards that cover the frame. They'll create the actual structure of the shed.
The roof: You can choose between a simple gable roof (the most common) or a shed roof (flatter and easier to build).
The doors: Get creative with your doors! You can use standard shed doors or build your own from scratch.
The finishing touches: Time to add some personality! Paint the shed, install windows, and add a little decorative trim.
Let's dive deeper into the construction:
1. The Foundation:
Materials: Pressure-treated 4x4 posts, pressure-treated 2x6 lumber, concrete blocks or gravel, wood screws, and a level.
Instructions:
Lay out the perimeter of your shed using stakes and string.
Dig holes for your corner posts, about 2 feet deep.
Set your corner posts in the holes, ensuring they are level and plumb.
Use concrete mix or gravel to secure the posts. Let it dry completely.
Attach pressure-treated 2x6 lumber to the posts to create the top and bottom plates of your foundation.
Secure everything with screws.
2. The Frame:
Materials: 2x4 lumber, wood screws, a level, a stud finder (optional), and a tape measure.
Instructions:
Cut your vertical studs to the desired height of the walls.
Attach the studs to the top and bottom plates of the foundation using screws.
Space the studs 16 inches apart for standard wall framing.
Attach the header (a horizontal beam) to the top of the wall framing to support the roof.
Repeat for all four walls.
3. The Walls and Roof:
Materials: Pressure-treated plywood or OSB sheathing, roofing shingles (or metal roofing), screws, and a nail gun (optional).
Instructions:
Attach the plywood or OSB sheathing to the frame using screws.
For the roof, cut the sheathing to fit the roof slope and attach it to the rafters (the beams supporting the roof).
Install the roofing shingles or metal roofing according to the manufacturer's instructions.
4. Doors:
Materials: Pre-made shed doors or lumber for DIY doors, hinges, door handles, and screws.
Instructions:
If using pre-made doors, simply cut a hole in the wall sheathing large enough for the door and attach it to the frame with hinges.
For DIY doors, cut the lumber for the door frame and paneling, assemble it, and attach it to the frame with hinges.
5. The Finishing Touches:
Materials: Exterior paint, trim boards, window frames (optional), and screws.
Instructions:
Paint the shed with your desired color.
Install trim boards around the doors and windows for a polished look.
Add windows if desired.
Enjoy your new backyard haven!
Remember, this is just a basic guide. You can customize the design and add your own personal touches. But don't be afraid to ask for help if you're unsure about anything. There are plenty of resources available online and at your local hardware store.
And most importantly, don't forget to have fun! Building a shed is a rewarding project that allows you to unleash your inner builder and create something useful and beautiful for your home.
No comments:
Post a Comment
Note: Only a member of this blog may post a comment.