Sunday, November 10, 2024
How to build a 8x12 shed and stick to your budget
Hey there, fellow DIYer! So you’re thinking about building a shed, huh? An 8x12 is a great size, perfect for storage, a workshop, or even a cozy little hangout space. But you’re also mindful of the budget, which is totally understandable! Building a shed can get pricey, but with some careful planning and a little elbow grease, you can definitely make it happen without breaking the bank.
Let’s dive into this project, step by step, and I’ll share my tips and tricks for keeping things affordable.
1. The Foundation: A Solid Start
The foundation is the backbone of your shed, so don't skimp here! A concrete slab is the most durable option, but it can also be the most expensive. Here are some cost-effective alternatives:
Gravel Pads: Easy and inexpensive. Simply level the ground, add a layer of gravel, and pack it down. This option works well on well-drained soil.
Concrete Block Foundation: These are relatively affordable and can be easily laid by yourself. You'll need to purchase concrete blocks, mortar, and a few tools.
Pressure-Treated Skids: This is a quick and easy option for sheds on a budget. Just ensure the skids are level and properly supported to prevent sagging.
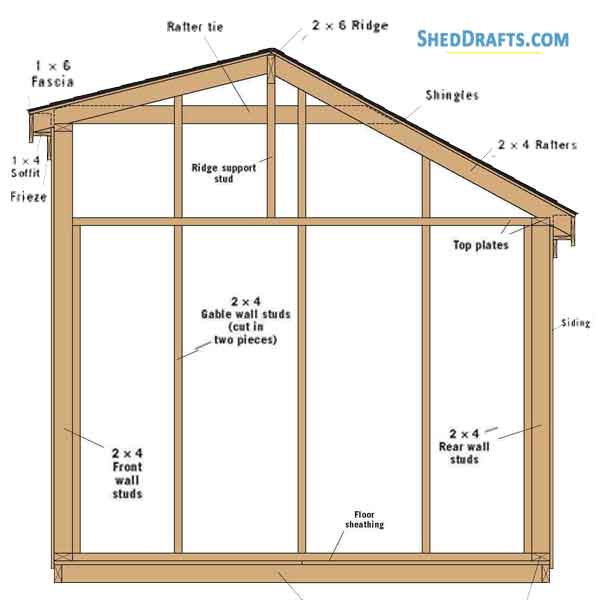
2. Framing: The Skeleton of Your Shed
The framing is the heart of your shed, providing support and structure. You can save money here by choosing pressure-treated lumber for the foundation and floor joists, and using standard dimensional lumber for the walls and roof.
Consider buying lumber in bulk: This can save you a decent chunk of change. Many lumberyards offer discounts for larger orders.
Shop around for the best prices: Don’t just go to the first lumberyard you find. Compare prices at multiple locations and look for deals and sales.
Don't be afraid to use recycled lumber: Look for salvaged or reclaimed wood. You can find great deals on Craigslist or at local salvage yards.
3. Roofing: Keeping the Weather Out
The roof protects your belongings from the elements, so it's essential to choose the right material.
Shingles: Asphalt shingles are the most budget-friendly option. Look for sales and compare prices from different manufacturers.
Metal Roofing: While more expensive upfront, metal roofing lasts longer and requires less maintenance, potentially saving you money in the long run.
Consider using recycled materials: There are many eco-friendly roofing options available, like recycled plastic or metal tiles.
4. Siding: The Outer Shell
Siding protects your shed from the elements and adds to its overall look.
Vinyl siding: This is a popular choice for sheds because it’s affordable, low-maintenance, and comes in various styles.
Fiber cement siding: Offers better durability and fire resistance than vinyl, but it’s pricier.
Wood siding: A classic look, but it requires more maintenance. Consider using reclaimed or recycled wood to save money.
5. Windows and Doors: Adding Light and Access
Windows let in natural light and doors provide access.
Shop around for deals: Look for sales on windows and doors at home improvement stores and online retailers.
Consider using standard sizes: Standard size windows and doors are generally more affordable.
DIY options: If you’re feeling adventurous, you can try making your own windows or doors to save money.
6. Finishing Touches: Personalizing Your Shed
Now it's time to add the finishing touches!
Paint or stain: This adds color and protection to your shed. Consider using leftover paint from other projects to save money.
Flooring: You can add a simple concrete floor, use leftover wood flooring, or even lay down inexpensive vinyl tiles.
Insulation: If you plan on using the shed year-round, consider adding insulation to the walls and ceiling.
7. Tools and Supplies:
You'll need a few basic tools for your project.
Basic Hand Tools: Hammer, saw, level, tape measure, drill, screwdriver, etc.
Power Tools (Optional): Circular saw, miter saw, drill press, sander, etc.
Hardware: Screws, nails, brackets, hinges, etc.
8. Planning and Design:
Sketch a plan: Draw a simple plan of your shed to determine the layout and materials you need.
Get permits: Check with your local building department to see if permits are required for shed construction.
Consider the environment: Choose building materials and methods that minimize environmental impact.
9. The DIY Advantage:
Labor costs: The biggest cost savings come from doing the work yourself!
Pride of ownership: There’s nothing quite like building something yourself.
Flexibility: You have complete control over the design and construction process.
Tips for Staying On Budget:
Shop around for the best deals: Don’t settle for the first price you see.
Use recycled or salvaged materials: Look for deals on Craigslist, Facebook Marketplace, or at local salvage yards.
Don’t be afraid to ask for help: Enlist friends or family to assist with the labor.
Plan ahead: The better your plan, the less likely you are to make costly mistakes.
Don’t be afraid to compromise: Sometimes, a less expensive option may be just as suitable.
Remember:
Building a shed is a rewarding project, but it’s also a lot of work. Take your time, plan carefully, and don’t be afraid to ask for help. With a little patience and some DIY know-how, you can build a beautiful and functional shed that will last for years to come â€" all without breaking the bank!
No comments:
Post a Comment
Note: Only a member of this blog may post a comment.