Sunday, November 10, 2024
How to build a 8x12 shed and stick to your budget
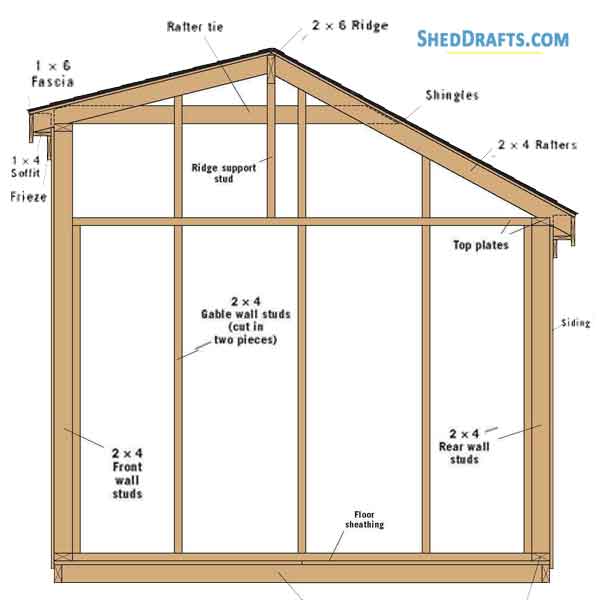
Hey there, fellow DIYer! So you’re thinking about building a shed, huh? An 8x12 is a great size, perfect for storage, a workshop, or even a cozy little hangout space. But you’re also mindful of the budget, which is totally understandable! Building a shed can get pricey, but with some careful planning and a little elbow grease, you can definitely make it happen without breaking the bank.
Let’s dive into this project, step by step, and I’ll share my tips and tricks for keeping things affordable.
1. The Foundation: A Solid Start
The foundation is the backbone of your shed, so don't skimp here! A concrete slab is the most durable option, but it can also be the most expensive. Here are some cost-effective alternatives:
Gravel Pads: Easy and inexpensive. Simply level the ground, add a layer of gravel, and pack it down. This option works well on well-drained soil.
Concrete Block Foundation: These are relatively affordable and can be easily laid by yourself. You'll need to purchase concrete blocks, mortar, and a few tools.
Pressure-Treated Skids: This is a quick and easy option for sheds on a budget. Just ensure the skids are level and properly supported to prevent sagging.
2. Framing: The Skeleton of Your Shed
The framing is the heart of your shed, providing support and structure. You can save money here by choosing pressure-treated lumber for the foundation and floor joists, and using standard dimensional lumber for the walls and roof.
Consider buying lumber in bulk: This can save you a decent chunk of change. Many lumberyards offer discounts for larger orders.
Shop around for the best prices: Don’t just go to the first lumberyard you find. Compare prices at multiple locations and look for deals and sales.
Don't be afraid to use recycled lumber: Look for salvaged or reclaimed wood. You can find great deals on Craigslist or at local salvage yards.
3. Roofing: Keeping the Weather Out
The roof protects your belongings from the elements, so it's essential to choose the right material.
Shingles: Asphalt shingles are the most budget-friendly option. Look for sales and compare prices from different manufacturers.
Metal Roofing: While more expensive upfront, metal roofing lasts longer and requires less maintenance, potentially saving you money in the long run.
Consider using recycled materials: There are many eco-friendly roofing options available, like recycled plastic or metal tiles.
4. Siding: The Outer Shell
Siding protects your shed from the elements and adds to its overall look.
Vinyl siding: This is a popular choice for sheds because it’s affordable, low-maintenance, and comes in various styles.
Fiber cement siding: Offers better durability and fire resistance than vinyl, but it’s pricier.
Wood siding: A classic look, but it requires more maintenance. Consider using reclaimed or recycled wood to save money.
5. Windows and Doors: Adding Light and Access
Windows let in natural light and doors provide access.
Shop around for deals: Look for sales on windows and doors at home improvement stores and online retailers.
Consider using standard sizes: Standard size windows and doors are generally more affordable.
DIY options: If you’re feeling adventurous, you can try making your own windows or doors to save money.
6. Finishing Touches: Personalizing Your Shed
Now it's time to add the finishing touches!
Paint or stain: This adds color and protection to your shed. Consider using leftover paint from other projects to save money.
Flooring: You can add a simple concrete floor, use leftover wood flooring, or even lay down inexpensive vinyl tiles.
Insulation: If you plan on using the shed year-round, consider adding insulation to the walls and ceiling.
7. Tools and Supplies:
You'll need a few basic tools for your project.
Basic Hand Tools: Hammer, saw, level, tape measure, drill, screwdriver, etc.
Power Tools (Optional): Circular saw, miter saw, drill press, sander, etc.
Hardware: Screws, nails, brackets, hinges, etc.
8. Planning and Design:
Sketch a plan: Draw a simple plan of your shed to determine the layout and materials you need.
Get permits: Check with your local building department to see if permits are required for shed construction.
Consider the environment: Choose building materials and methods that minimize environmental impact.
9. The DIY Advantage:
Labor costs: The biggest cost savings come from doing the work yourself!
Pride of ownership: There’s nothing quite like building something yourself.
Flexibility: You have complete control over the design and construction process.
Tips for Staying On Budget:
Shop around for the best deals: Don’t settle for the first price you see.
Use recycled or salvaged materials: Look for deals on Craigslist, Facebook Marketplace, or at local salvage yards.
Don’t be afraid to ask for help: Enlist friends or family to assist with the labor.
Plan ahead: The better your plan, the less likely you are to make costly mistakes.
Don’t be afraid to compromise: Sometimes, a less expensive option may be just as suitable.
Remember:
Building a shed is a rewarding project, but it’s also a lot of work. Take your time, plan carefully, and don’t be afraid to ask for help. With a little patience and some DIY know-how, you can build a beautiful and functional shed that will last for years to come â€" all without breaking the bank!

Affordable 8x12 shed design ideas you can build today

Hey there, fellow shed enthusiast! Are you tired of tripping over your gardening tools, staring at a pile of boxes in the garage, or just yearning for a little extra space? Well, let's talk sheds! Specifically, let's talk about building your own affordable 8x12 shed.
Now, I know what you're thinking: "Building a shed? That sounds like a lot of work!" And you're right, it can be! But it's also a super rewarding project, and with a little planning and elbow grease, you can easily create a space that perfectly suits your needs without breaking the bank.
Here's the deal: we're not talking about some fancy, high-end shed here. We're talking about simple, practical, and affordable. Think of it as a blank canvas waiting for your personal touch!
So, how do we get started?
First things first, let's talk design. An 8x12 shed gives you a decent amount of space to work with. You can go for a classic, rectangular shape or get a little creative with a slightly angled roof or a small porch. Here are a few ideas to get your gears turning:
1. The "Classic":
Traditional gable roof: This is the most common and easiest to build. You'll need a little extra height for the roof pitch, but it's sturdy and provides good drainage.
Simple siding: Choose a durable, affordable siding material like vinyl or composite.
Double doors: This gives you easy access and plenty of space for larger items.
2. The "Workhorse":
Lean-to roof: This design is perfect for storage or a small workshop. It's simple, economical, and easy to build.
Side door: A single side door can be a great option for smaller sheds.
Storage shelves: Make use of the vertical space by adding shelves along the walls.
3. The "Cozy Corner":
Small porch: Add a small covered porch to create a relaxing outdoor space.
Windows: Include windows to bring in natural light and create a more inviting feel.
Painted exterior: Give your shed a pop of color with a cheerful paint job.
Now, onto the materials.
Foundation: A basic concrete slab or gravel base is the most affordable option. You can also consider using pre-made concrete blocks.
Framing: Pressure-treated lumber is a must for the base and floor joists. You can use standard framing lumber for the walls and roof.
Sheathing: Plywood is a reliable choice for the walls and roof.
Roofing: Asphalt shingles are affordable and easy to install.
Siding: Vinyl siding is durable and budget-friendly.
Doors and Windows: You can find affordable options at most home improvement stores.
Alright, time to talk budget!
DIY: You can definitely save a lot of money by building your shed yourself. Just be sure to factor in the cost of tools and materials.
Materials: Shop around for the best prices on lumber, roofing, and siding.
Labor: If you're not comfortable with building, you can hire a contractor to help with specific tasks, such as framing or roofing.
Pro Tip: Check your local building codes! Some areas have restrictions on shed sizes and construction requirements.
Ready to get building?
Here's a step-by-step plan to guide you:
1. Planning: Get your design finalized, determine your budget, and make sure you have all the necessary permits.
2. Foundation: Prepare your chosen foundation base, making sure it's level and well-drained.
3. Framing: Construct the walls and roof using your chosen framing lumber.
4. Sheathing: Apply plywood to the walls and roof.
5. Roofing: Install your chosen roofing material.
6. Siding: Cover the exterior with your chosen siding.
7. Doors and Windows: Install doors and windows.
8. Finishing touches: Add trim, paint, and any other decorative elements.
Remember: This is a general outline. There are tons of resources online and in libraries to help you with specific building instructions and techniques.
Don't be afraid to get creative!
This shed is your blank canvas. You can add a small loft for storage, install a workbench, or even create a cozy outdoor living space with comfy furniture and lighting.
The possibilities are endless!
Building your own shed is a journey, not just a project. You'll learn new skills, save money, and create a space that's perfect for you. So, what are you waiting for? Grab your tools, gather your materials, and get building!
Step-by-step guide to building a 12x20 storage shed

Alright, so you've finally decided to tackle that storage shed project. Good on you! You're about to embark on a journey of sawdust, hammers, and a whole lot of satisfaction. Now, don't worry, it's not as intimidating as it seems. With a little planning, some elbow grease, and this handy guide, you'll be sipping lemonade in your brand new shed before you know it.
Step 1: Planning is Key - Let's Get Organized
First things first, you need a plan. This isn't just about throwing some lumber together, it's about building a solid structure that'll last. Think about what you'll be storing, how much space you need, and what style you're going for.
Size Matters: We're talking 12x20, so you have ample room for your stuff. But, do you need a specific layout? A workbench? An overhang for tools? Get it down on paper!
Location, Location, Location: Where will it go? Think about sunlight, drainage, and access. A flat, level surface is ideal, but don't be afraid of a slight slope. You can always adjust.
Building Codes and Permits: Don't skip this part! Check your local building codes and see if a permit is required. It's better to be safe than sorry.
Budget Breakdown: Set a budget and stick to it! Get quotes for materials, tools, and even consider hiring help if needed.
Step 2: Materials: Picking the Right Stuff
With the plan in place, it's time to gather your tools and materials. Here's a basic list to get you started, but remember, this can vary depending on your design:
Lumber: Pressure-treated lumber for the foundation, floor joists, and bottom plates. You'll need framing lumber for walls, roof rafters, and the rest of the structure.
Sheathing: OSB or plywood for walls and roof.
Roofing: Shingles, underlayment, and flashing.
Siding: Vinyl, wood, or metal. Choose something that matches your style and fits your budget.
Doors and Windows: Choose the size and style that work for your needs.
Fasteners: Plenty of nails, screws, and staples.
Hardware: Hinges, door knobs, and any other hardware you might need.
Step 3: The Foundation: Laying the Groundwork
A solid foundation is crucial for any structure. Here's how to build a basic concrete foundation:
Dig the Footing: Mark your shed dimensions and excavate the area for a foundation footing. The footing should be about 6-8 inches deep and 12 inches wide.
Pour the Concrete: Mix concrete according to the manufacturer's instructions and pour it into the footing. Use a level to make sure it's even.
Curing: Allow the concrete to cure for at least 24 hours before you start building.
Step 4: Framing Up: Building the Skeleton
With the foundation set, it's time to build the framework. Here's a breakdown:
Floor Joists: Install floor joists on top of the foundation, spaced 16 inches apart.
Wall Plates: Attach bottom plates to the foundation and top plates to the floor joists, creating a frame for your walls.
Wall Studs: Install wall studs between the plates, spaced 16 inches apart.
Roof Trusses or Rafters: If you're using trusses, install them as per the manufacturer's instructions. If you're building rafters, cut them to length and attach them to the top plates.
Step 5: Sheathing and Siding: Giving it Form
Now it's time to start giving your shed a more finished look:
Sheathing: Install OSB or plywood sheathing over the framing. This creates a solid surface for the siding and roof.
Roofing: Install underlayment on the roof, followed by your chosen roofing material.
Siding: Attach your siding to the sheathing, following the manufacturer's instructions.
Step 6: Doors and Windows: Let in Some Light
Now, let's get those openings finished:
Door Frames: Install the door frames, making sure they are plumb and square.
Door Installation: Hang the door in the frame, making sure it opens and closes smoothly.
Windows: Install the windows following the manufacturer's instructions.
Step 7: Finishing Touches: The Detail Makes the Difference
You're almost there! Now comes the fun part - adding the finishing touches:
Interior Finishing: Add insulation, drywall, or paneling to the interior, depending on your preference.
Paint or Stain: Give your shed a fresh coat of paint or stain, both inside and out.
Electrical: If you're planning to have electricity in your shed, run the wiring according to local codes.
Flooring: Install flooring of your choice - concrete, wood, or even tiles.
Step 8: Celebrate Your Achievement!
Congratulations! You've just built a storage shed! Now, relax, enjoy your handiwork, and get ready to organize all that stuff you've been meaning to put away.
Pro Tips:
Don't rush the process. Take your time and make sure each step is done correctly.
Ask for help if you need it. There's no shame in enlisting the help of a friend or family member.
Safety First! Always wear safety glasses, gloves, and appropriate footwear when working with power tools.
Take breaks! It's easy to get caught up in the excitement, but don't forget to take a break to avoid fatigue and mistakes.
Remember, building a shed is a rewarding experience. You'll learn new skills, gain a sense of accomplishment, and create a valuable space for your belongings. So, go forth, and build your own shed!
Essential tips for building a 10x12 garden shed yourself
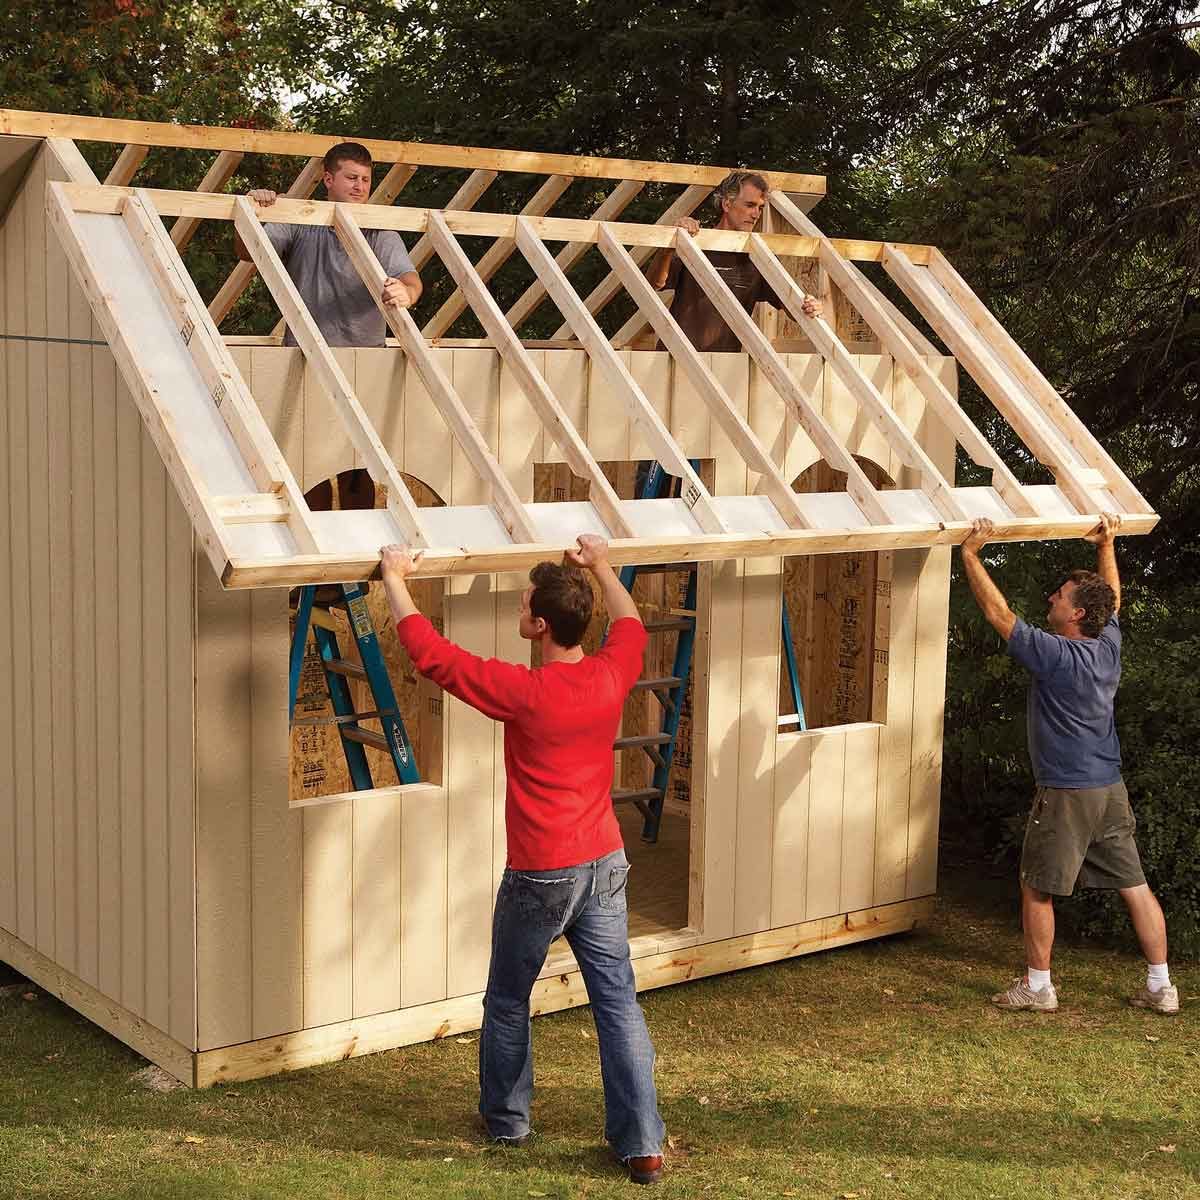
Alright, so you’re ready to build a 10x12 garden shed. Good for you! It's a fantastic project, and you'll be so proud of yourself when you're done. Plus, you'll have a fantastic space for your tools, bikes, and all those garden goodies. But before you dive in headfirst, let's talk about the essentials to make this project smooth sailing.
### 1. Planning is Key: Getting Your Ducks in a Row
First things first, planning. You wouldn't build a house without a blueprint, right? Same goes for your shed. Think about the shed's purpose - will it be just for storage, a workshop, or maybe even a tiny office?
Get Inspired: Browse online for ideas, check out your local building supply store, or even visit a friend's shed. Look for features you like, like windows, doors, and even shelves.
Draw it Out: A simple sketch is a must. Measure your space to make sure your shed fits, and consider how you'll access it - will you need a ramp or stairs?
Materials and Budget: This is crucial. Figure out what kind of wood you want to use, think about siding and roofing, and get an estimate for the cost of everything. Don't forget about tools - you might need to buy some, but maybe you can borrow from a neighbor.
### 2. Foundation: The Unsung Hero
Now, the foundation is the base of your entire shed, so don't skimp here. There are a few options:
Concrete Slab: This is the strongest and most durable choice, but it's also the most expensive and time-consuming.
Concrete Blocks: A bit more affordable, these are laid in a pattern, and you can even use them for extra storage space later.
Pressure-Treated Skirts: Perfect for a simpler foundation, these wood timbers are set in the ground and create a sturdy base.
Whatever you choose, make sure the foundation is level! You can use a level or even a spirit level to get it just right.
### 3. The Frame: Building the Bones
This is where the fun begins! The frame is the heart of your shed, and it needs to be strong and square. Here's the deal:
Get Your Wood: Pressure-treated lumber for the base, dimensional lumber for the walls and roof. Use treated lumber for anything that will be in contact with the ground.
Build the Floor: Start by building the floor frame, using joists (long pieces of lumber) and stringers (shorter pieces to support the joists). Make sure it's super sturdy!
Wall Framing: Use studs (the vertical pieces of wood that make up the walls) and plates (the horizontal pieces that connect the studs). Remember to add bracing for extra strength.
Roof Framing: For a simple shed, a gable roof is perfect. Use rafters to create the slope, and make sure you have enough overhang for rain.
Take your time, check your measurements, and use a level and square to make sure everything is straight and square!
### 4. Sheathing: Protecting Your Structure
The sheathing is basically the skin of your shed. It goes over the frame and helps hold everything together.
OSB Sheathing: This is the most common type of sheathing, affordable and strong. It's like a giant sheet of plywood but less expensive.
Plywood Sheathing: Stronger and more durable, plywood sheathing is also slightly more expensive.
Make sure you nail the sheathing properly to the frame.
### 5. Siding and Roofing: The Finishing Touches
Now, it's time for the fun part - giving your shed its personality!
Siding: Choose a material that matches your style and budget. Wood, vinyl, metal, and fiber cement are all popular choices.
Roofing: Shingles are common and easy to install, but you can also use metal or even rubber roofing. Don't forget to add flashing to protect against water leaks.
### 6. Doors and Windows: Let There Be Light
Adding doors and windows brings your shed to life. You'll need:
Door Frame: Use a pre-hung door for ease of installation. A double door is perfect for larger sheds.
Window Frames: Consider windows on different walls for ventilation and natural light.
Make sure you install everything securely and seal any gaps to prevent drafts.
### 7. Interior Finish: Putting the Finishing Touches
Almost there! The last step is the interior:
Insulation: Consider insulation to make your shed more comfortable and energy-efficient. Fiberglass or spray foam insulation are great options.
Drywall: You can add drywall to the walls and ceiling for a smoother finish and easier painting.
Flooring: Choose a flooring that suits your needs. Concrete, vinyl tiles, or even wood flooring are all great options.
### 8. The Finishing Touches: Making it Your Own
Now, it's time to personalize your shed!
Paint or Stain: Give your shed a fresh look with paint or stain. Choose colors that complement your home or your garden.
Lighting: Add light fixtures for safety and convenience.
Shelves, Hooks, and Storage: Organize your space with shelves, hooks, and other storage solutions.
### 9. Safety First: Stay Safe and Sound
Building a shed can be a fun and rewarding experience, but it's crucial to prioritize safety:
Wear Safety Glasses: Protect your eyes from debris.
Use Hearing Protection: Power tools can be loud, so protect your ears.
Work with a Helper: Having someone assist you can be helpful, especially for lifting heavy objects.
### 10. Enjoy Your New Space!
Congratulations! You've built a fantastic shed! Enjoy the fruits of your labor and revel in your new space. Maybe even celebrate with a barbecue in your beautiful backyard. Now, go forth and shed those worries!
How to design and build your own affordable 8x10 shed

Alright, so you're dreaming of a backyard shed. Maybe it's for storing tools, crafting, gardening, or just a quiet retreat. But those pre-built sheds can be pricey, right? Don't worry, you can build your own 8x10 shed for a fraction of the cost, and have the satisfaction of knowing you did it yourself.
Let's break down the steps:
### 1. Planning and Preparation: The Foundation of Your Shed
Before you dive into the wood pile, take some time to plan. This is crucial for a strong and stable shed. Here's what to think about:
Location, Location, Location: Choose a spot with good drainage, away from trees and underground utilities. Check local building codes for setback requirements and permits you may need.
Foundation Type: You have a few options:
Concrete Slab: The most permanent and sturdy, but also the most expensive.
Concrete Blocks: A good middle ground, offering good stability without the cost of a slab.
Pressure-Treated Skids: Simple and affordable, but less durable than concrete.
Shed Style: Do you want a gable roof, a shed roof, or something else entirely? This influences the materials and construction techniques.
Materials: Decide on your budget and desired look. Consider wood, metal, or even recycled materials.
Pro Tip: Draw a simple plan, including dimensions and roof pitch. This will be your guide throughout the project.
### 2. Getting Your Hands Dirty: The Foundation
Once you've planned your foundation, it's time to build it:
Concrete Slab: Hire a concrete contractor or do it yourself with proper tools and knowledge.
Concrete Blocks: Lay blocks on a level base, using mortar to secure them.
Pressure-Treated Skids: Cut and assemble skids according to your plan. Use pressure-treated lumber to resist rot and insects.
Remember: Ensure the foundation is level before you start building the shed. Use a level to check the foundation and adjust as needed.
### 3. Framing the Structure: The Skeleton of Your Shed
Now for the fun part! Building the frame gives your shed its shape and strength. Here's the process:
Wall Framing: Cut and assemble wall panels using 2x4 lumber.
Floor Joists: Install floor joists on the foundation, creating a solid base for your shed floor.
Roof Rafters: Cut and attach rafters to the wall plates, creating the roof structure.
Roof Sheathing: Install plywood sheathing on top of the rafters to create a solid roof surface.
Pro Tip: Use a stud finder to locate existing studs in your house if you're attaching the shed to your house. This ensures proper connection and avoids damaging plumbing or wiring.
### 4. Sheathing and Roofing: Protecting Your Haven
Next, you need to protect your shed from the elements.
Wall Sheathing: Install plywood or OSB sheathing over the wall framing. This creates a solid surface for siding and insulation.
Roofing: Choose your roofing material â€" asphalt shingles, metal, or even recycled materials. Follow manufacturer instructions for installation.
Siding: Select your siding â€" wood, vinyl, or metal â€" and install it according to your chosen style.
Remember: Always wear appropriate safety gear, like gloves, safety glasses, and a hard hat.
### 5. Adding the Finishing Touches: Making it Your Own
The fun part is here! Time to add the details that make your shed unique:
Windows and Doors: Choose the size, style, and placement of windows and doors to match your needs and design.
Interior Finishes: Add insulation, drywall, and paint to create a comfortable and functional interior.
Electrical: If you plan to add electrical outlets, consult with a qualified electrician for proper wiring.
Pro Tip: Don't forget about ventilation! Add vents in the roof and walls to prevent moisture buildup and keep your shed well-ventilated.
### 6. Enjoy Your New Backyard Haven: Time to Relax
Congratulations! You've built your own shed. Now it's time to enjoy the fruits of your labor. Decorate, organize, and make it your own.
Remember: Regular maintenance will keep your shed looking good and lasting for years to come.
Beyond the Basics:
Adding a Deck: A deck adds a touch of luxury and expands your shed's functionality.
Building a Workshop: Include workbench space, storage shelves, and tool hooks for an organized workspace.
Creating a Garden Shed: Make space for potting benches, seed starting trays, and tools for your green thumb.
Building your own shed is an achievable project for anyone with basic carpentry skills and some dedication. With careful planning and execution, you can create a valuable addition to your backyard that serves your needs and provides years of enjoyment.
Affordable 8x10 shed plans with step-by-step diy instructions
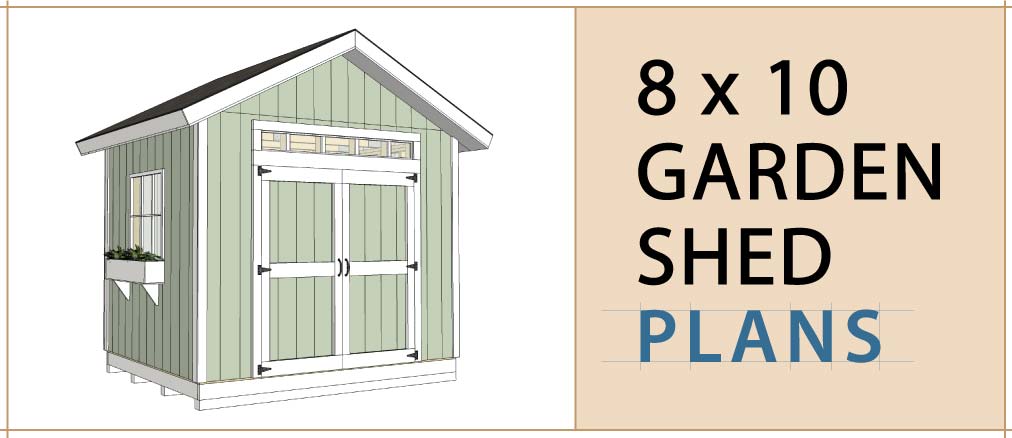
Hey there, fellow DIYer! Tired of clutter taking over your garage or basement? Dreaming of a tidy space to store your tools, bikes, or gardening supplies? Building a small shed can be the perfect solution, and the best part is, it doesn't have to break the bank.
This guide will walk you through building an 8x10 shed on a budget, with clear step-by-step instructions and tips for maximizing your savings. We'll cover everything from materials and tools to building techniques, making sure even a beginner can tackle this project with confidence.
Let's Get Started!
Planning Your Shed
Before you start grabbing tools, it's crucial to have a solid plan. Here are the key factors to consider:
Location, Location, Location: Choose a spot for your shed that's level, accessible, and preferably close to a power source if you plan on adding electricity. Remember to check local building codes for setbacks and permits.
Foundation: A concrete slab is the most durable, but it can be expensive. For budget-friendly options, consider a gravel base or even pressure-treated lumber skids.
Style: Do you prefer a simple gable roof or a more complex shed with a Dutch door? Think about your storage needs and aesthetic preferences.
Material Choices: Pressure-treated lumber for the foundation and floor joists is essential for durability. You can save money by using standard lumber for the walls and roof.
Gather Your Materials
Here's a list of essential materials for a basic 8x10 shed:
Lumber:
Pressure-treated lumber for the foundation (2x6 or 2x8)
2x4 lumber for the walls, roof framing, and interior supports
1/2-inch plywood for the walls, roof sheathing, and floor
Hardware:
Roofing felt
Shingles (asphalt, metal, or composite)
Exterior siding (vinyl, wood, or fiber cement)
Windows (optional)
Door (single or double)
Screws, nails, and staples
Other:
Concrete mix (for a concrete slab foundation)
Gravel (for a gravel base)
Paint (for exterior and interior)
DIY Tools for the Job
You'll need the following tools for this project:
Power Tools:
Circular saw or miter saw
Drill/driver
Hammer
Nail gun (optional)
Staple gun
Hand Tools:
Measuring tape
Level
Pencil
Safety glasses
Work gloves
Claw hammer
Pry bar
Step-by-Step Construction Guide
Now that you have your materials and tools, let's get building!
1. Foundation:
Concrete Slab: Follow the manufacturer's instructions for mixing and pouring concrete. Ensure a level surface.
Gravel Base: Lay down a layer of gravel, compact it, and level it out.
Pressure-Treated Skids: Construct a frame using pressure-treated lumber for the foundation.
2. Floor Framing:
Measure and cut: Cut 2x4s to create floor joists, spaced 16 inches apart.
Attach: Attach the joists to the foundation using screws or nails.
Plywood: Lay plywood over the joists, securing it with screws or nails.
3. Walls:
Frame: Cut 2x4s to create wall studs, spaced 16 inches apart.
Connect: Attach the studs to the floor framing using screws or nails. Use a level to ensure they are plumb.
Top Plate: Connect the studs with a top plate to form the wall assembly.
4. Roof Framing:
Rafters: Cut 2x4s to create rafters, using a roof pitch calculator to determine the appropriate length.
Attach: Attach the rafters to the top plates, using screws or nails.
Roof Sheathing: Lay plywood sheathing over the rafters, securing it with screws or nails.
5. Exterior Sheathing & Siding:
Plywood Sheathing: Cover the walls with plywood sheathing.
Siding: Attach the exterior siding of your choice, following the manufacturer's instructions.
6. Roofing:
Roofing Felt: Install roofing felt over the plywood sheathing.
Shingles: Apply shingles, starting at the bottom and working your way up, following the manufacturer's instructions.
7. Windows & Doors:
Openings: Cut out openings for windows and doors using a circular saw.
Install: Follow the manufacturer's instructions for installing windows and doors.
8. Interior Finishes:
Drywall or Paneling: Cover the interior walls with drywall or paneling.
Paint: Paint the interior and exterior of your shed.
9. Finishing Touches:
Door Hardware: Install door hardware, such as handles, hinges, and a lock.
Trim: Add trim around windows, doors, and the roofline.
Lighting: Consider adding electrical wiring and lights (consult an electrician for this step).
Tips for Saving Money
Shop around: Compare prices for materials from different suppliers.
Use salvaged materials: Check local salvage yards or construction sites for reclaimed lumber.
DIY tasks: Do as much of the work yourself as possible.
Simple design: Opt for a basic shed design to reduce the complexity and material costs.
Consider using less expensive materials: While pressure-treated lumber is important for the foundation, you can use standard lumber for walls and roof to save money.
A Few Words of Wisdom:
Safety First: Always wear safety glasses, gloves, and appropriate clothing when working with power tools and sharp objects.
Read instructions: Carefully follow the instructions for each material and tool you use.
Take breaks: Don't overwork yourself; take breaks to avoid fatigue and accidents.
Enjoy the process: Building a shed is a rewarding experience. Take your time and have fun!
And there you have it! A comprehensive guide to building an 8x10 shed on a budget. With some planning, effort, and a little DIY spirit, you can create a fantastic storage solution that fits your needs and your wallet. Happy building!
Tips for building a firewood storage shed that’s easy to maintain

Alright, let's talk firewood storage. You know the drill: you've got your woodpile, but it's getting rained on, the bugs are having a party in there, and the whole thing is just looking a little…unruly. Time to build a shed!
But here's the thing: you want it to be easy to maintain. You don't want to spend your weekends battling weeds and cleaning up messes. We're going for a "set it and forget it" kind of shed here. So grab your coffee, let's chat about how to make that happen!
Location, Location, Location:
Think about where you'll use your firewood most often. If it's by the fireplace, make sure the shed's close by for easy loading. But also consider the sun. A south-facing wall will get the most sunlight, which helps dry wood faster. Remember, dry wood burns better!
Foundation:
You've got options here. A concrete slab is super durable and will keep the wood off the ground, but it can be pricey. A gravel base is less expensive, but make sure it's thick enough to prevent sinking. And if you're feeling ambitious, you could even use pavers, which can be surprisingly affordable and add a touch of charm to your backyard.
The Shed Itself:
Materials: Wood is a classic choice because it's easy to work with. Pressure-treated lumber is a good option for the floor and base, since it's resistant to rot and moisture. But you can also consider metal or even recycled plastic if you're looking for a low-maintenance option.
Size: Think about how much firewood you need to store. A shed that's 8 feet by 10 feet is a good starting point, but adjust the size based on your needs. And don't forget about leaving enough room for access and loading.
Roof: A simple gable roof is easy to build and provides good drainage. You can use shingles, metal, or even corrugated plastic for roofing. Just make sure it's waterproof!
Walls: Open, slatted walls are ideal for air circulation, which helps your wood dry out. They also let in some sunshine, which is a bonus. You can use 1x4s or 1x6s for the slats, and space them about an inch apart.
Floor: If you're using a concrete base, you don't need a floor. But if you're going with gravel, you'll want to add a floor for protection against dirt and insects. Pressure-treated plywood is a good choice.
Door: A double door is convenient for loading and unloading large logs. Make sure the door is sturdy enough to withstand the weight of the wood.
Extra Touches for Easy Maintenance:
Screened vents: Add screens to the bottom of your walls to allow for air circulation while keeping out bugs. It's like a built-in ventilation system for your wood!
Pull-out shelves: These are awesome if you're using smaller pieces of firewood. They make it easy to grab what you need without having to dig through a pile.
Rain gutters: A small gutter system can direct rainwater away from your shed, keeping the wood dry and preventing water damage.
The Finishing Touches:
Paint or stain: A coat of paint or stain will protect your shed from the elements and make it look even more appealing. Choose a color that complements your house or the surrounding landscape.
Clean up: Before you start stacking wood, sweep out the shed and remove any debris. This will prevent problems with insects and pests.
Stacking: Stack your wood neatly, leaving some space between each piece to allow for air circulation. This helps the wood dry out faster and prevents rot.
Maintenance Made Easy:
Keep it clean: Sweep out the shed regularly to prevent dust and debris from building up.
Check for pests: Inspect the shed for signs of insects or rodents. If you find any, take steps to eliminate them.
Maintain the roof: Check the roof for leaks or damage, and repair them promptly.
Keep the wood dry: If you notice any wood that looks damp, try to move it to a drier spot or consider using a dehumidifier.
And there you have it! You've got a sturdy, well-ventilated firewood storage shed that's easy to maintain. Now you can sit back, relax, and enjoy those cozy winter evenings by the fireplace knowing your wood is safe and dry. Happy chopping!